 |
WWII Uniforms / Flight Gear Ed Nored Collection |
Personnel
Mission Reports
photos copyright ©2006-2018 by Ed Nored, used by permission
Flight Gear 1944-1945 / F-3 Heated Suit
Parachutes 1943-1945
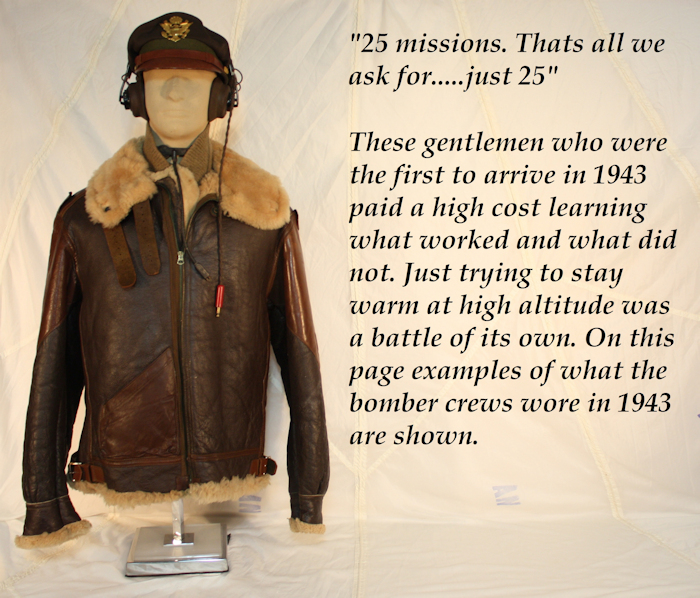
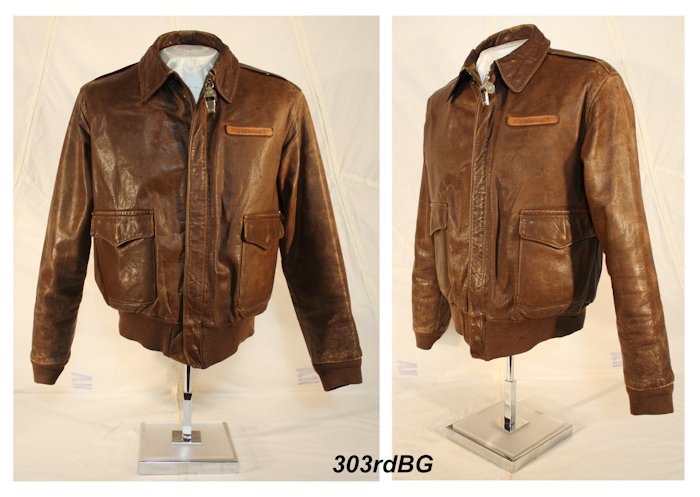
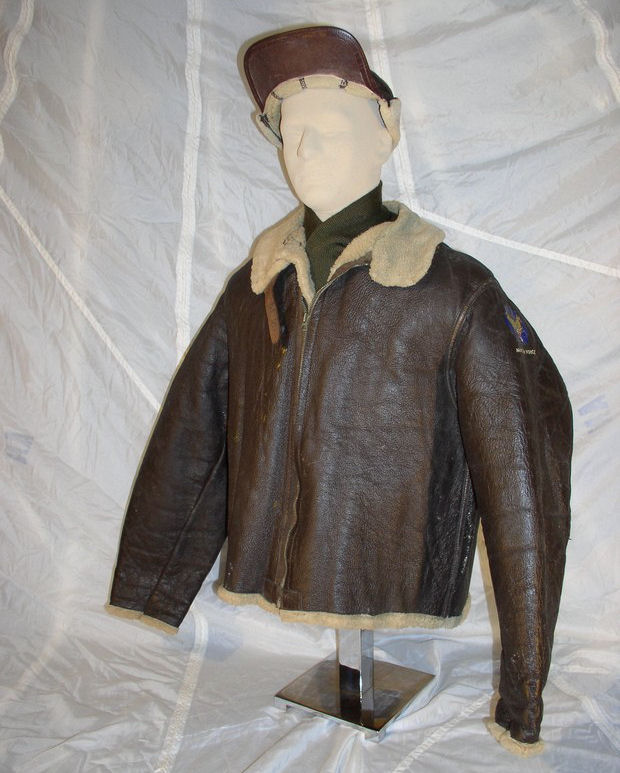
(2-xx) Shown above is the A-2 jacket. Name tag on chest is F.Z. Gearhart. Black and Gold label reads: Type A-2 Drawing 30-1415 AC Contract No. w535 ac 28560 Poughkeepsie Leather Coat Co. INC. Poughkeepsie N. Y. property Air Force U.S. Army. Size 42.
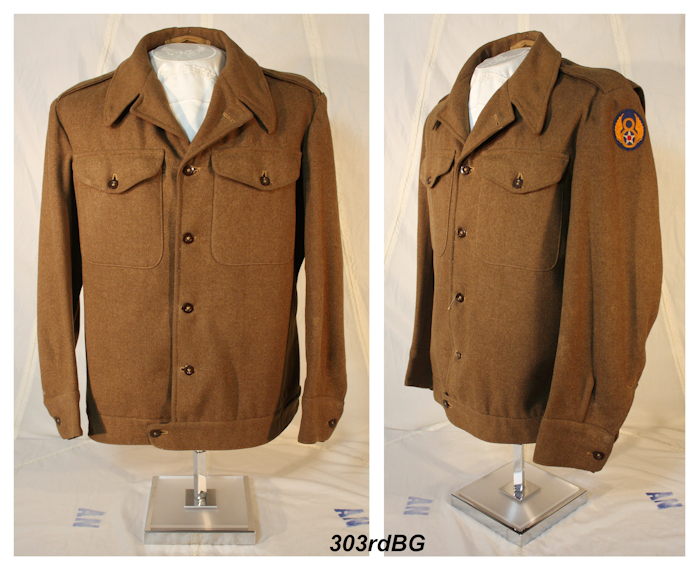
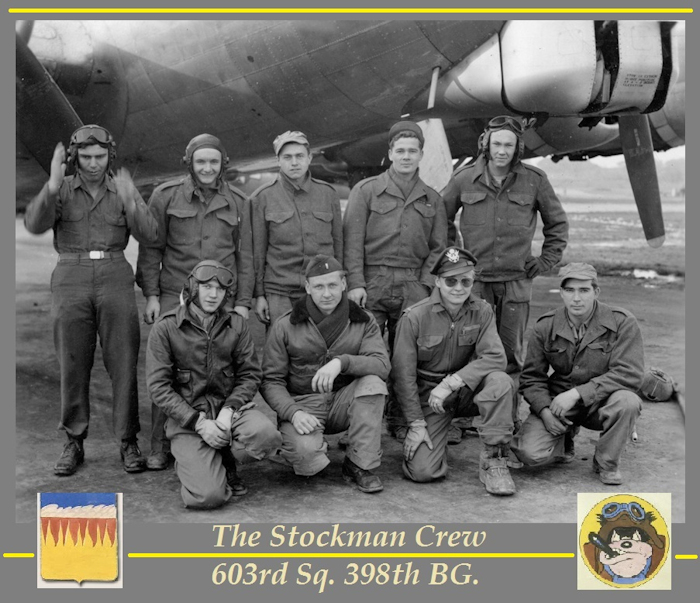
(2-xx) Jacket above is called a Jacket, Field enlisted mans ETO. jacket. Original label inside with arrow dated 1943. Manufacturer's name is very faint, but reads "Montague Burton LTD Leeds."Shown below is the Stockman crew of the 603rd SQ 398th BG. Five of the men are wearing the ETO jacket. One man has had his jacket cut down at the waist in the classic "IKE" style. Other items worn by this crew are B-8 goggles, A-11 helmets, A-6 boots with the added strap, one B-10 and one A-2 jacket. Far right lying on the ground is what looks exactly like a AN-6513-1a parachute. One man wears the AN-6550 flight suit. Three men wear the short billed HBT caps. Note the large scarf. I'll take a pass on the 3 pairs of gloves I see.
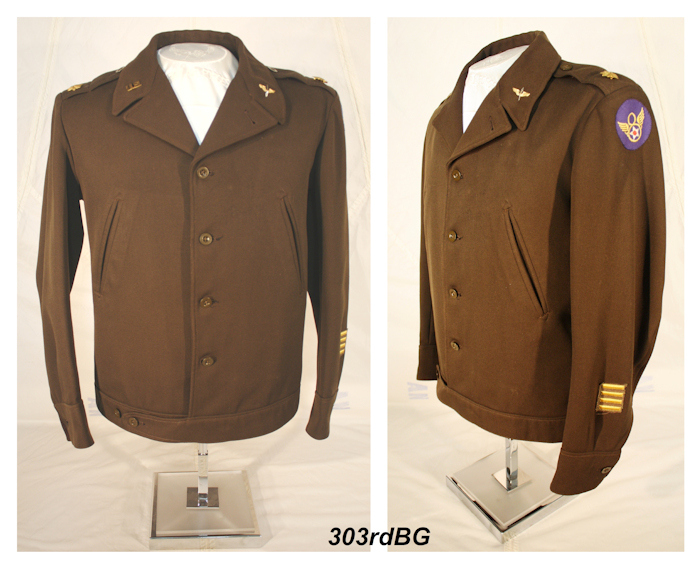
(2-xx) Shown above is, according to the label. -Jacket Field Officers U.S.A. ETO- Arrow marked and made by The Rego Clothiers Ltd 194? Last # has thread sewn through it. Examples of the Officer Grade ETO jacket can be seen on the 358th Glass Crew. The 358th Grisham Crew and the 358th Holm Crew. Concerning the rank depicted on the jacket, I have to warn collectors not to place too much value on a uniform where anyone can place what they want to on it.
|
OF LOUIS H. SILVESTRY 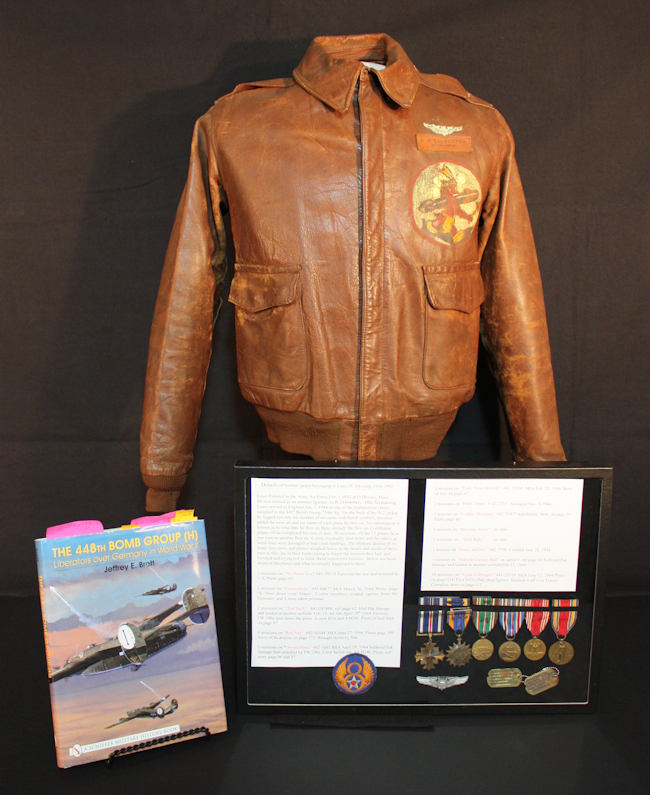 (2-1) Shown above is the personal A-2 worn by Louis H. Silvestry of the 714 SQ. 448th BG 8th AF (B-24s). He arrived with the unit as part of a large group of replacement crews on Jan. 7th, 1944. His remarkable record of 30 missions and the planes he served on is all documented on the back of his jacket. This is one of the most unique painted A-2's I have seen. In the book "The 448th BOMB GROUP (H)" published by SCHIFFER. Silvestry, as well as the planes, are listed and photographs show many of the planes with matching nose art matching the jacket. 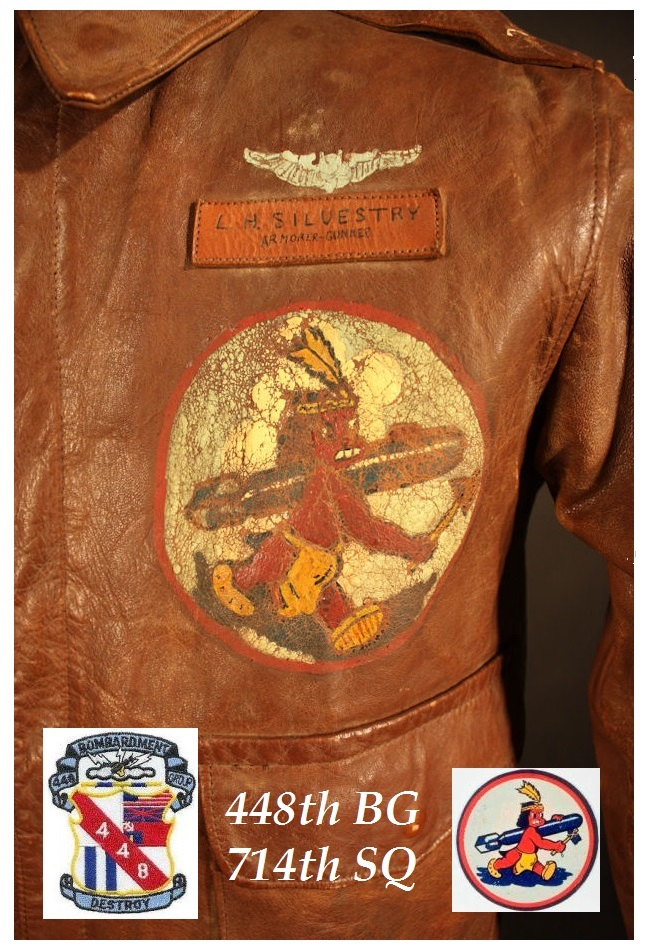 (2-2) Present on the front of Silvestry's jacket is a leather name tag. Below his name are the words "armorer-gunner." Above it are hand painted wings and below the name tag is a hand painted 714th SQ. insignia. 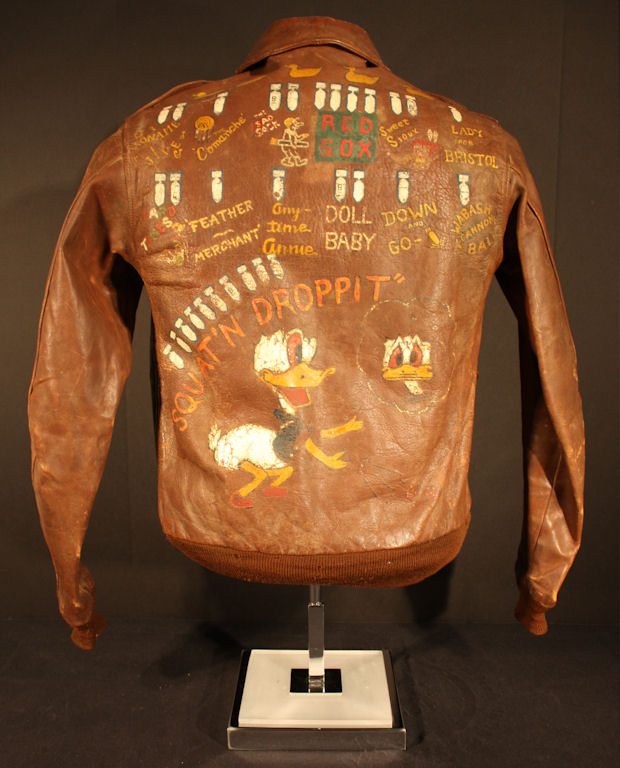 (2-3) The serial number and brief history of each plane he served on as a replacement crew is noted. It will become apparent just how lucky he was. Silvestry flew 2 missions on "No Name Jive" # 41-29230.This plane returned to the US. He flew 1 mission on "Commanche" # 42-64477. This plane was shot down over France Mar. 1944. He flew 2 missions on "Sad Sack" # 42-285888. This plane was shot down by 190's April 29th, 1944. He flew 4 missions on "Red Sox". #42-50344. This plane was lost to flak on June 27th, 1944. He flew 2 missions on "Sweet Sioux" # 42-7683. On April 29, 44 the plane was damaged by flak and then fighters finished it off. He flew 1 mission on "Lady From Bristoll" # 42-52100. This plane was lost on Feb. 25, 1944. 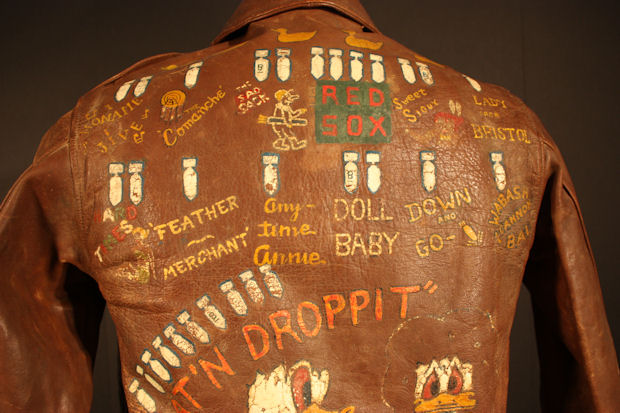 (2-4) He flew 2 missions on "Hard Times" # 42-7755. Salvaged Nov. 8 44 He flew 1 mission on "Feather Merchant" # 42-73477. Plane transferred to other unit. He flew 1 mission on "Anytime Annie". No info at this time. He flew 2 missions on "Doll Baby". No info at this time. He flew 1 mission on "Down and Go" # 42-7758, which crashed June 22, 1944. He flew 1 mission on "Wabash Cannon Ball" . No info. It was damaged on June 12, 44 by flak and forced to land at another airfield. His last 10 missions were on "Squat'n Droppit" #41-28710. This plane was lost on June 12, 44. Hit by flak then attacked by fighters. |
 (2-5) Shown above is certainly one of the most iconic pieces of flight gear of WWII – the A-2 jacket. Each jacket has its own color, texture and character. They were made even better by air crew who personalized them with bomb group and/or squadron patches. Shown above and below is the A-2 that belonged to S/Sgt Joseph Berry, who flew 30 missions as a tail gunner with the 392nd Bomb Group (B-24s). The Bomb Group patch and an 8th AF insignia has been sewn on to chest and sleeve. 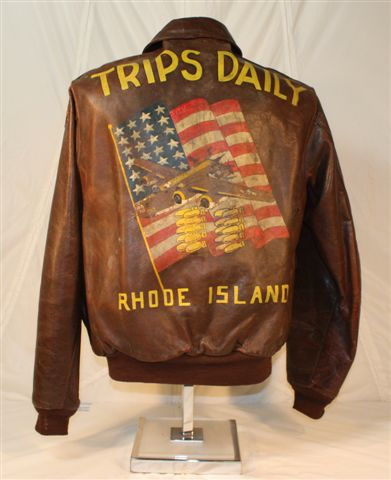 (2-6) Above is the backside of S/Sgt Berry's A-2 jacket. The art work shows a B-24 coming out of the American Flag with 20 bombs dropping. Berry was from the state of Rhode Island. "Trips Daily" was the name given to the B-24. The nose art of the plane depicts an "outhouse" with the crescent moon symbol, and the figure of a women wearing an apron, head scarf, with corn cob pipe scurrying to the house. In large letters below the house is "Trips Daily." If you happen to have the 392nd BG history book, a photo of the nose art is on page 135. Joe's jacket shows 20 bombs. These symbols, just like the ones painted on the planes, recorded how many missions he had been on. His paperwork verifies 30 missions. 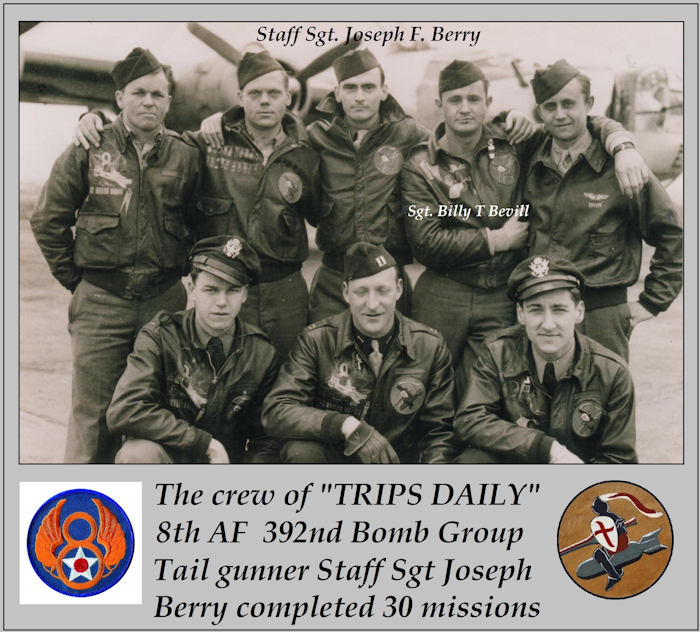 (2-7) Shown above is Joe with his crew. (Standing center) His 30 missions were flown between July 24, 1944 and the last one flown March 23, 1945. They bombed from altitudes of 15,000 to 25,000 feet. The exception was the Sept 18, 1944 mission where they flew down to 50-300 feet to drop supplies to our troops in Holland. Ground fire struck one of their oxygen tanks and it caught fire. They fought desperately to extinguish the flames and wound up throwing much of the burning material out the waist window. Joe made notes of seeing people on the ground waving and hundreds of gliders on the ground. This was Operation Market Garden.( Suggest strongly you see the movie A Bridge Too Far.) Joe flew his missions on several different B-24's. According to his notes they flew only 6 missions on TRIPS DAILY. His plane, like others, was hit by flak on most of his missions. Joe saw other planes shot down by fighters, flak and mid air collisions. Not to mention fighting through bad weather and loss of an engine due to flak. They had a close call over Madgeburg when another B-24 shot down a ME-262 trying to sneak up behind their plane using the contrails as cover. 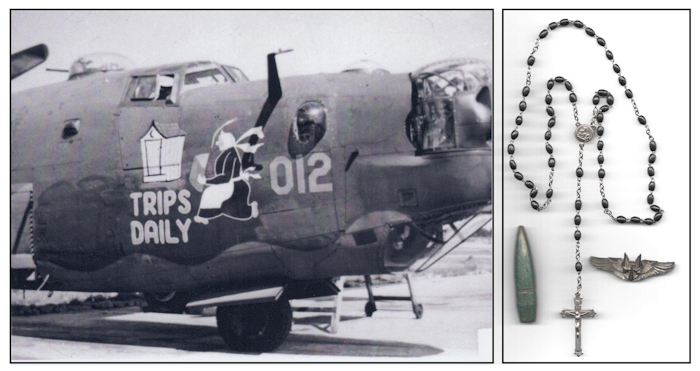 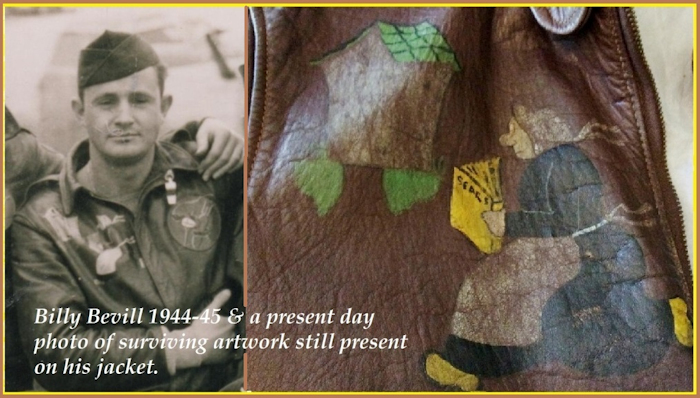 (2-xx) The daughter of Billy Bevill, identified in the TRIPPS DAILY crew photo above, contacted me and provided me with additional information about the great Dad she had and how she still loved to wear his jacket on occasion. She was kind enough to provide me with several photos of the jacket. The one item, shown above and unique only to Bill's jacket, was a copy of the art work done on the nose of the plane. With a Sears catalog in hand, Grandma heads for the outhouse. Four colors are used, yellow, black, green and white, which has mostly rubbed off. They may or may not be the same colors used on the plane. Thanks for sharing Miss Bevill, God Bless. 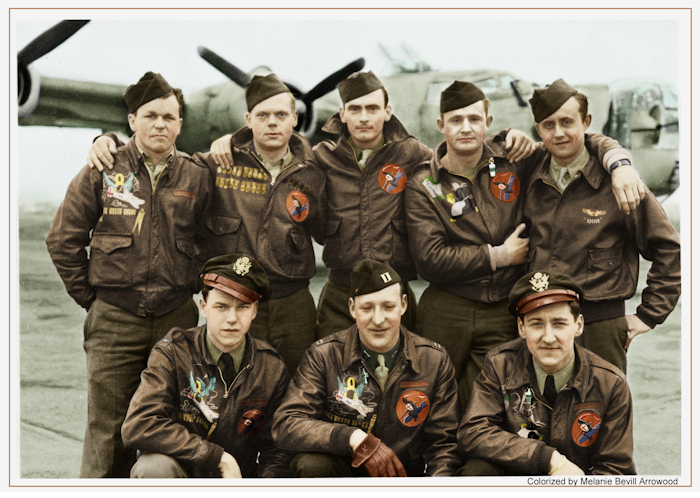 (2-xx) Shown above is a colorized version of the "TRIPPS DAILY" crew, provided to us from the daughters of Billy Bevill, Lisa and Melanie. Thanks for sharing with the site, ladies. |
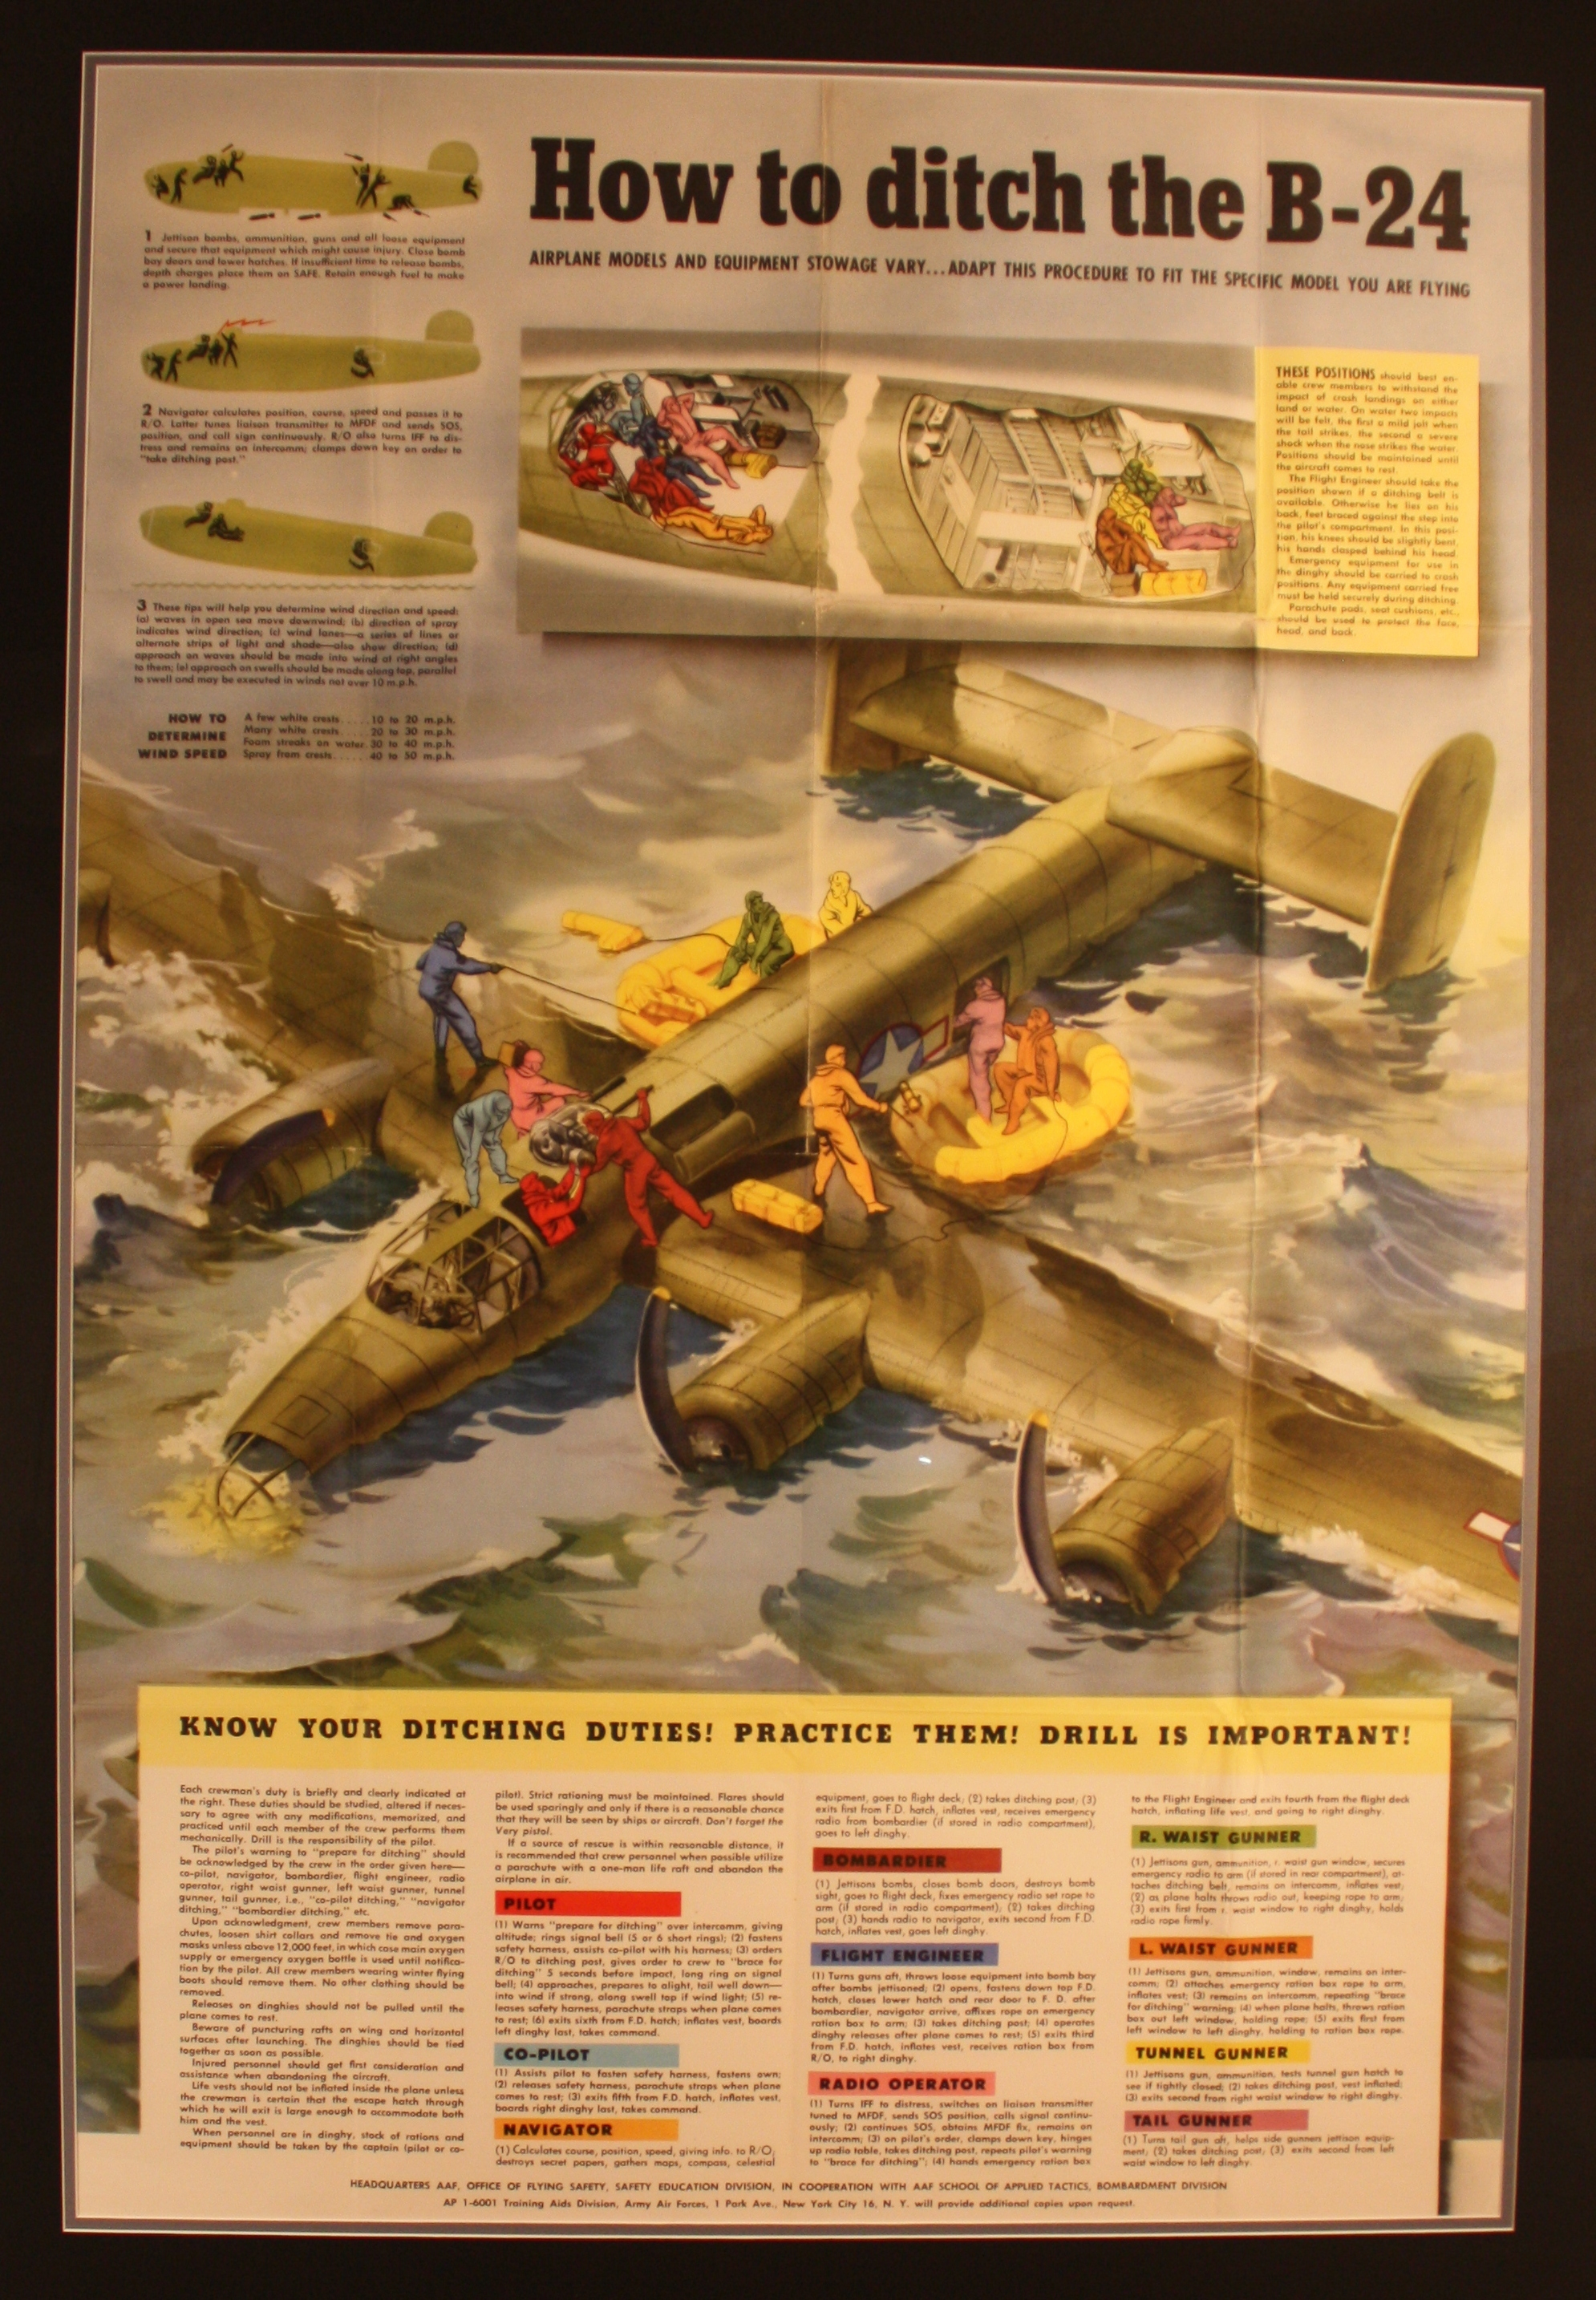
(2-xx) The authentic poster above measures 27 x 39 inches. (click for a larger image)
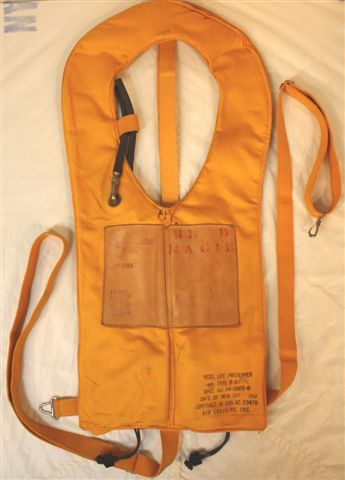
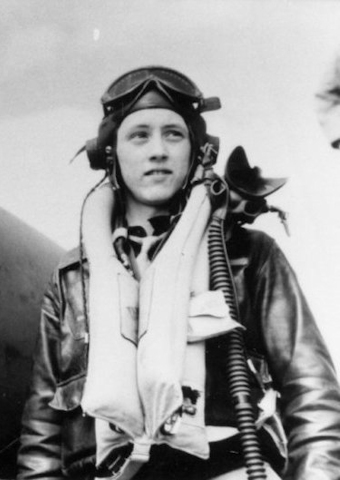
(2-8) Shown above is a the early war period B-3 life preserver or "Mae West." The date of manufacture is September 1942. This vest is a much more comfortable vest to wear than the B-4. It's a tad bit narrower and more flexible. It is easily identified by its square leather piece on the front. Shown on the right you can see a B-3 that has for some reason been inflated by the pilot. The pilot above is 1Lt Russell W. Erb, Jr. of the 55th FG 353rd SQ. He flew P-38's (plane name "Drippy Lil"), but at some point transferred to the 9th AF and was killed flying a P-47.

(2-9) Shown above is the B-4 life preserver and the original box it came in. The B-3 was made of material on the outside and a rubber bladder inside. The B-4 was all rubber and more rigid. The date of manufacture is February 1943. It replaced the B-3.
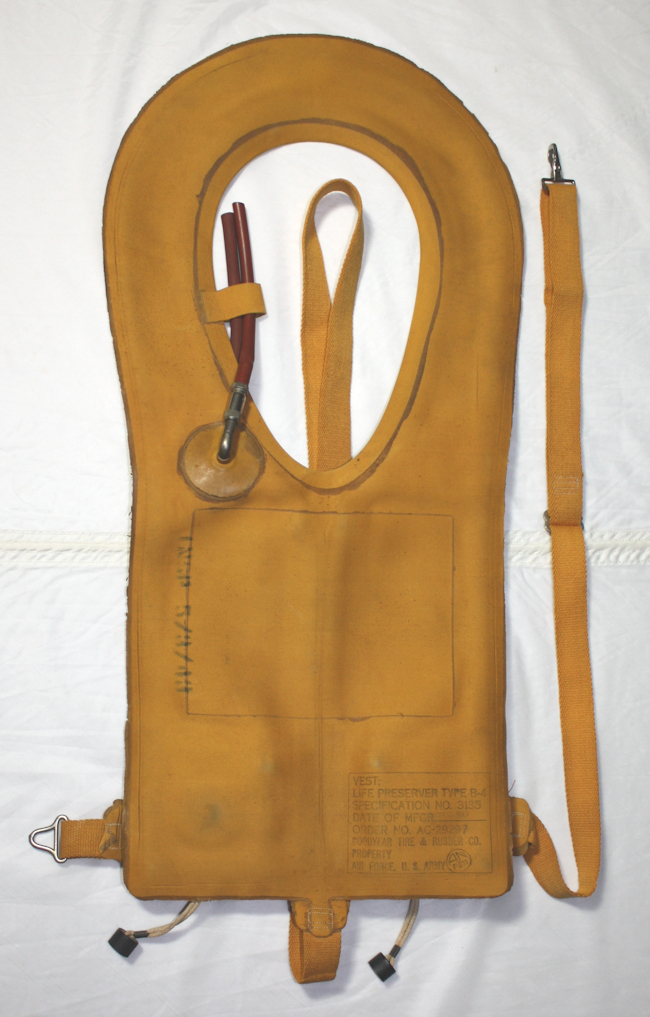
(2-10) Shown above is a Goodyear manufactured B-4 life preserver . The red hoses are authentic and show up on B-3's as well. It has an inspection date stamped 5-3-43.
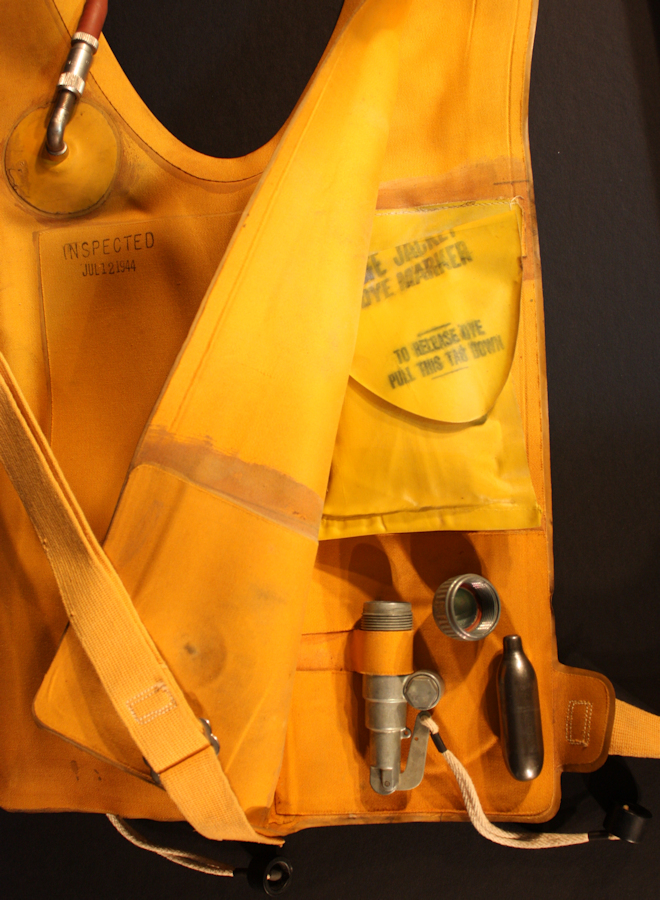
(2-XX) Shown above between the flaps of the B-4 life preserver is the LIFE JACKET DYE MARKER with instructions TO RELEASE DYE PULL THIS TAB DOWN. The Dye dissolves in the water and provides a larger visual target for those people looking for a downed pilot. This pouch is applied with glue. I have removed the CO2 cartridge which is inserted in its metal housing shown to the left. The dome shaped cap is shown. There are two CO2 cartridges, one for the left and right. You simply pulled down the string on both sides to fill the vest. You never charge the vest while wearing a parachute harness. The harness does not expand and all that expanding pressure has only one way to go.
(2-11) Above is the famous F-1 "blue bunny" heated suit. To see examples of this suit go to the 359th Eisenhart Crew. Eisenhart is wearing the F-1 and is shaking the hand of Gen Travis, who is wearing the F-2. Another example is the Cogswell Crew. Look at S/Sgt Paul Davis. Also see the Fyler crew and Lt. Jackson in Lead Crew #75.
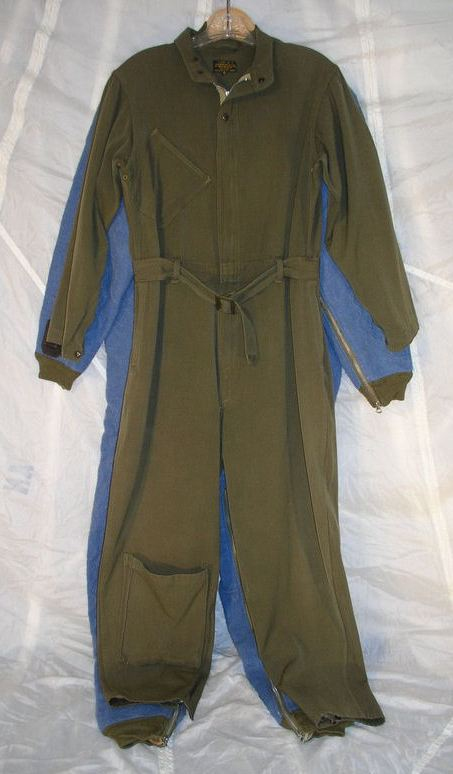
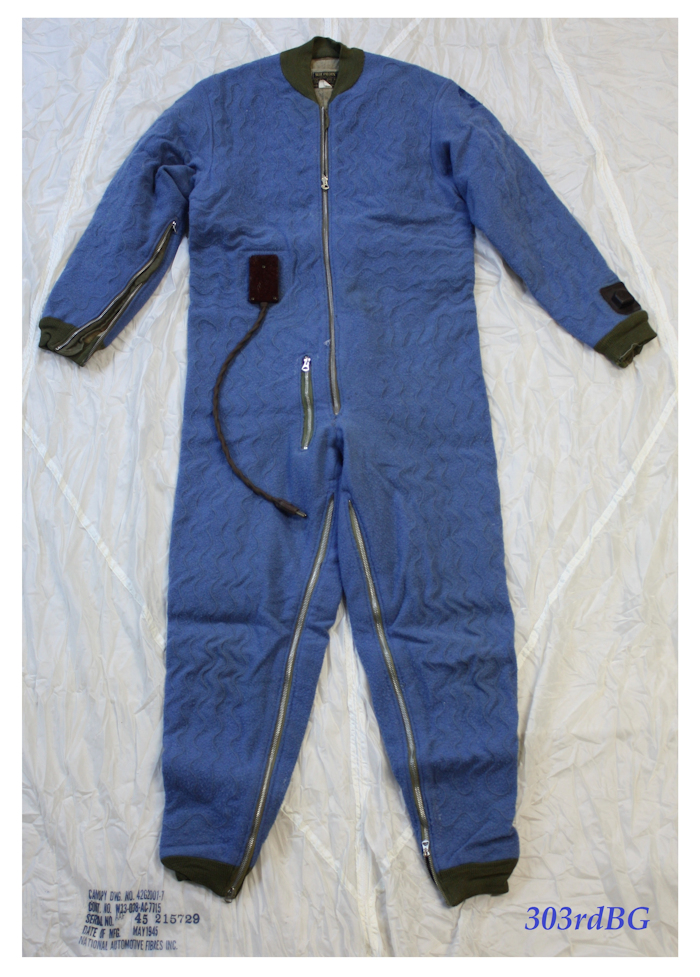
(2-12) You should understand that because new and improved flight gear arrived, it didn't mean that all of the early items of flight gear was thrown away. You can still see traces of it in 1945 including the F-1 suit. Two of the quickest items to disappear would have been the heavy leather shearling B-3 jacket and A-3 pants. Pictured above is the A-4 flight suit which in some cases would have been worn over the F-1. Go to Lead Crew Mission #191 and check out Lt Nance. In Lead Crew Mission #219, 1Lt Blythe is wearing the A-4 flight suit underneath the F-2 heated uniform.
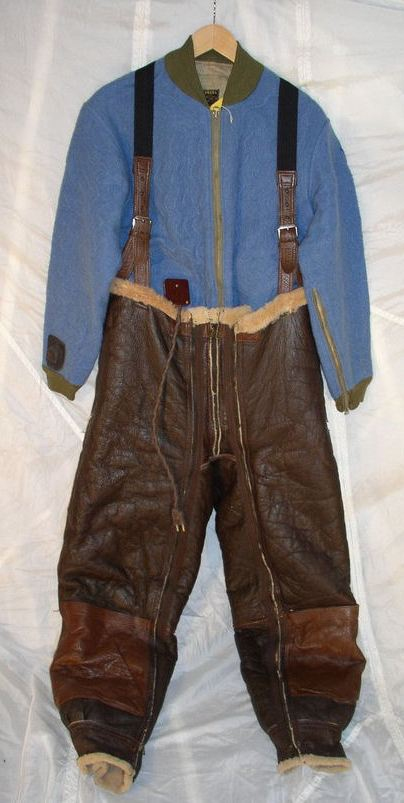
(2-13) Over the F-1 and over the A-4 suit, if desired, came the A-3 leather pants, shown here without the A-4. After the pants, the B-3 jacket would top things off.
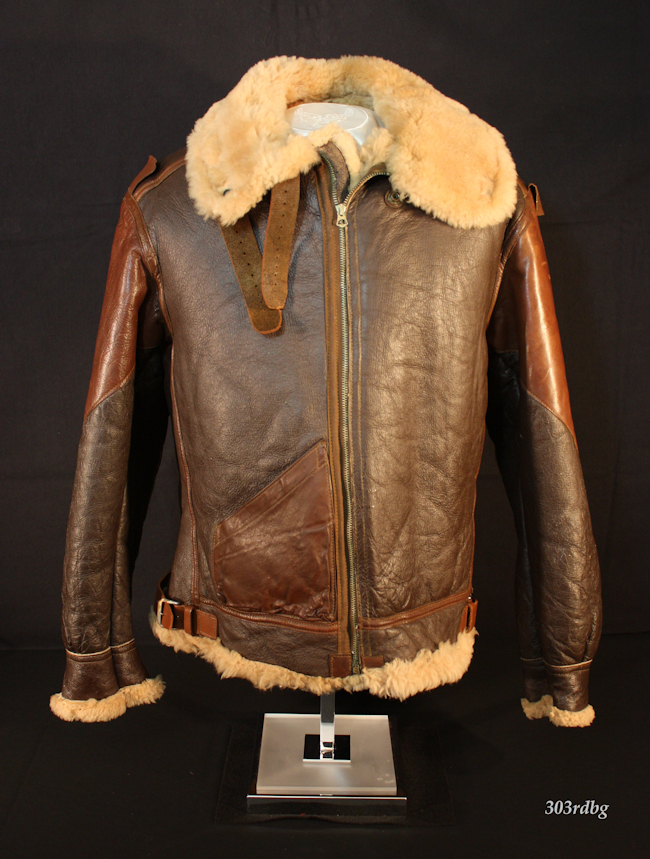
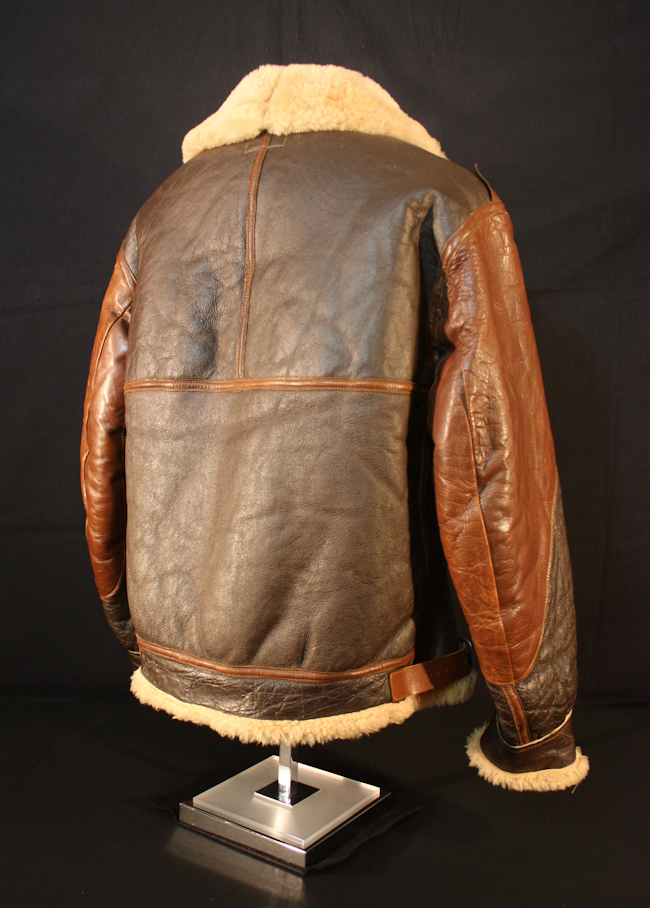
(2-xx) Shown above and below is the Type B-3 jacket. It was made by Roughwear Clothing, Air Corp contract 42-5111-2, Size 44 regular. This jacket is in great condition and is very heavy. The leather is still strong, but I warn beginning collectors, until you have seen and handled several examples be extremely careful how you pick up these jackets. Your fingers may break through the leather. Never put it on a hanger. Damaged B-3 jackets pop up on ebay all the time.
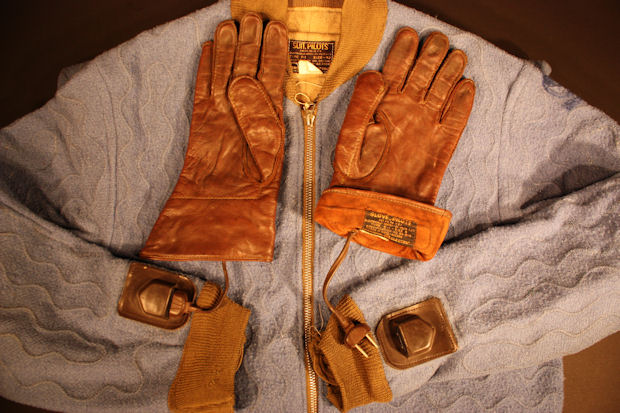
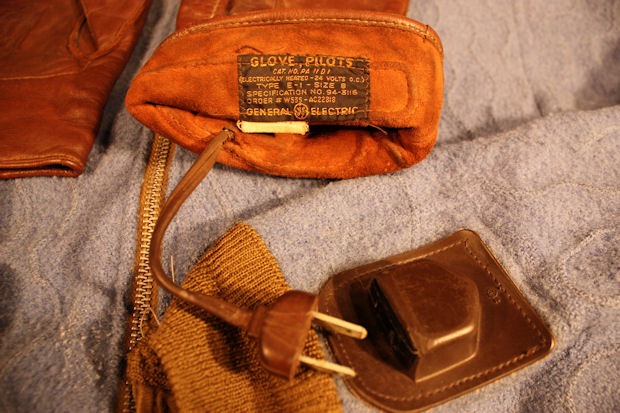
(2-14) Shown are the gloves that go with the F-1. From a collecting aspect, the gloves and the booties that go with this suit are extremely rare. The cord and plug leading from the glove are nearly the same as the plug you have on any of your present day lamps or appliances. To see gloves hanging from the F-1, see Lead Crew Mission #30. The man with the gloves is wearing what appears to be the AAC B-1 flight suit. The yellow tag on the suit states this particular F-1 has been inspected and found to be "serviceable" and dated 1945. I will let the next owner of this suit determine if it works or not. Click on Dressing for a Mission to see a crewman donning the F-1 suit for a mission. See him about to plug in his glove to the connector on the sleeve of the F-1 and see him connect his heated shoes.
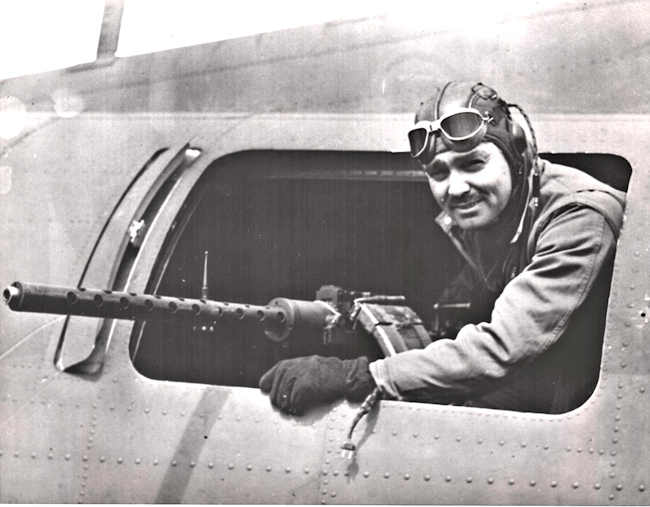
(2-xx) Shown above is a press photo of Clark Gable. I posted this photo because of the Electric cord connection hanging from the wrist and thought it may be a short extension cord to connect to the F-1, if you happen to have long arms. I referred to Greg Pon's book, 8th Air Force book that mentioned that many of the American crews were being furnished the RAF heated gloves due to a shortage of the American heated gloves. I then turned to Mick Prodger's book, LUFTWAFFE vs. RAF and he has a photo of the RAF heated glove. After viewing thousands of black and white photos you learn to recognize shades, textures and aspects. In the photo above Gable is wearing the RAF heated gloves, a B-6 helmet with B-7 or 6530 goggles and A-4 flight coveralls.
(2-15) vvvv vvvv
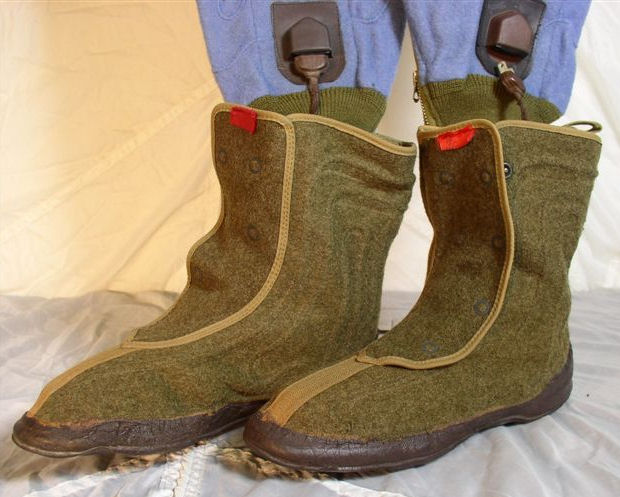
(2-16) Shown above and below are the correct heated shoes for the F-1. The label inside�shoe��reads, "Shoe�Pilot Electrically heated�24 volts D.C. Type D-1." After slipping the heated shoes on and plugging them into the suit, the wearer would then slip them into the A-6 boot.

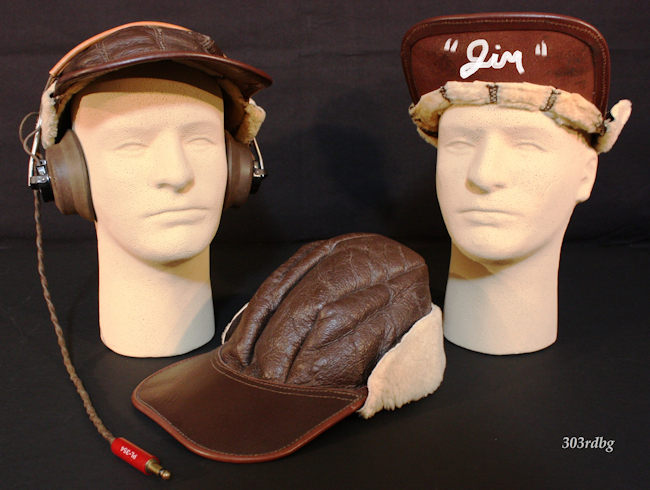
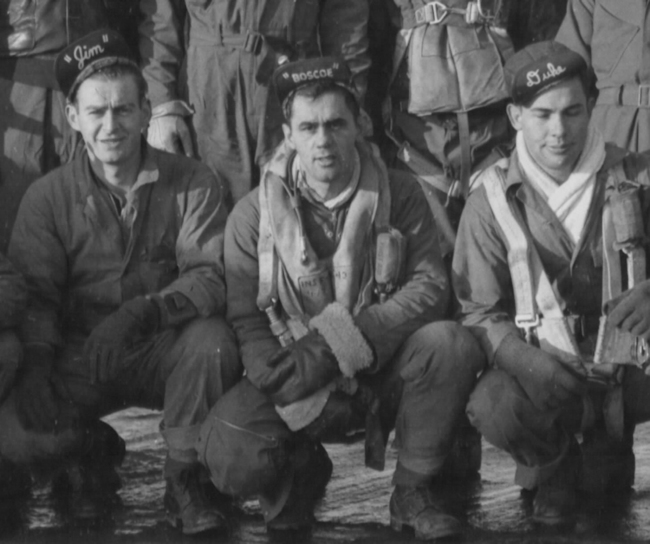
(2-xx) Shown above are three examples of the B-2 hat/cap. The top two are made by Werber Sportswear Co. Newburgh, N.Y. The lower B-2 is from the Shaw-Barton,inc. of Coshocton, Ohio. Referring to Jim's hat, it was very common for some men to paint their name or nic-name under the bill. It was also common to see many ground and air crew wearing the hat with the bill turned up. See Jim and his crewmates in the photo below, cropped from the lead crew mission # 87 photo. (No! this is not his original hat shown above) The head set shown above is the HS-33.
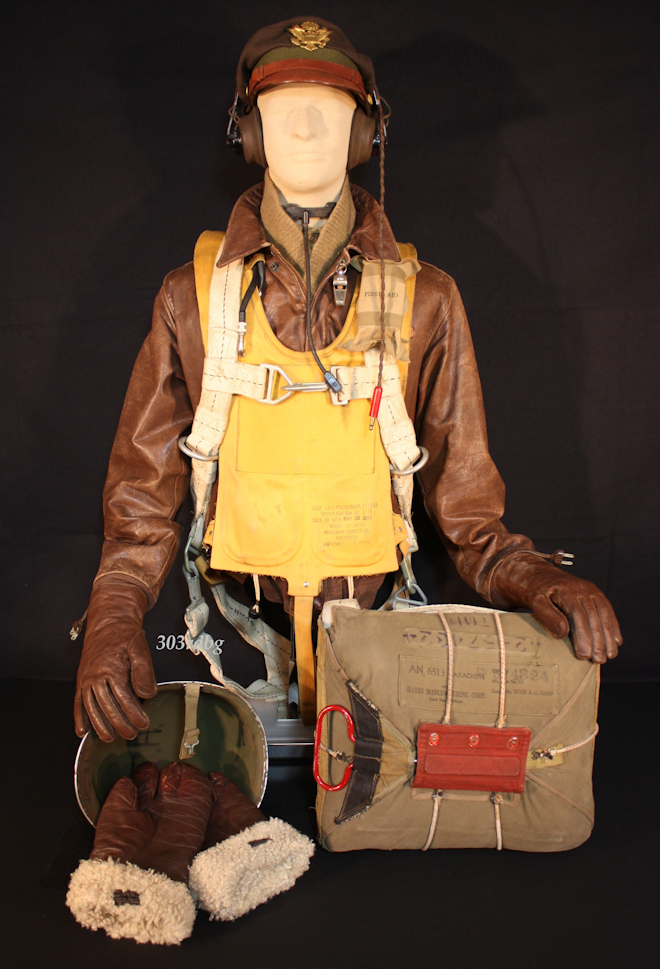
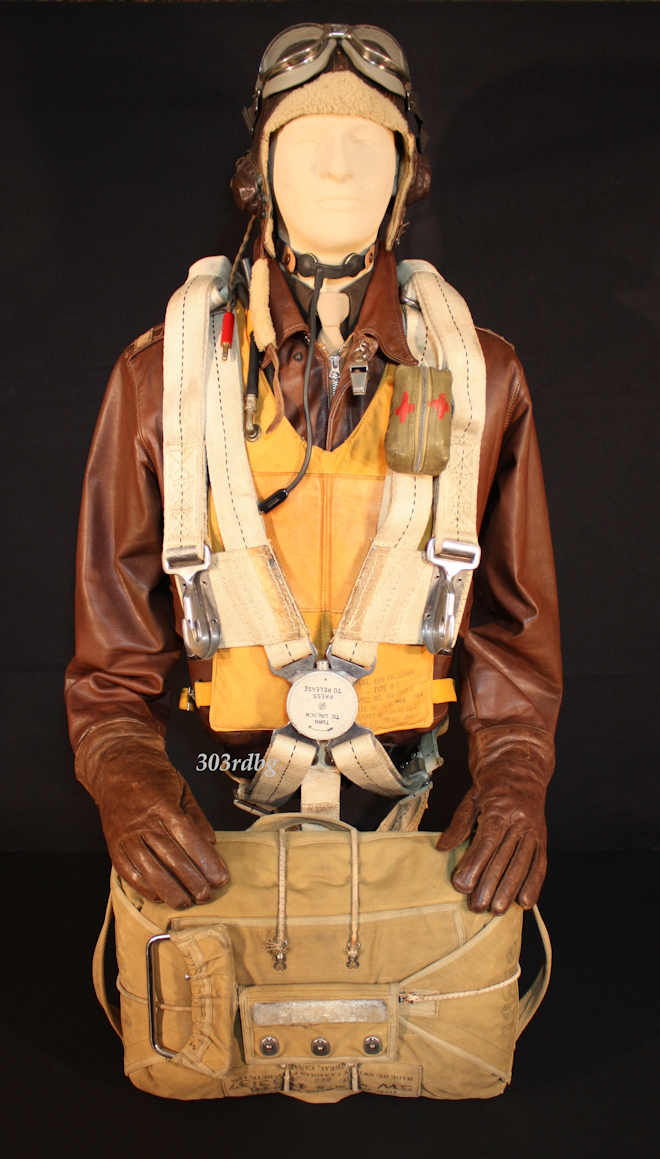
(2-18) Shown above is typical gear and clothing worn the first year in England. This officer wears the classic crusher cap with HS-33 headset. Around the throat is the T-30 throat microphone. The scarf might be a private purchase, a gift from loved ones back home or government issue. The whistle is Air Ministry marked as all the whistles you see here. The A-2 jacket is the Poughkeepsie jacket shown at the top of the page. The life preserver is the type B-4 made by the Hodgman Rubber Company dated May 20th, 1943.The parachute harness is shown in great detail on this page. Scroll down to photos 26, 27 and 28. The officers left hand rests on the AN-6513-1 parachute. Important note: This chute would not have red paint on it in early 1943. I do not have one unmarked to display.
The right hand rests on a standard issue infantry helmet with the liner removed. This way it would fit over your flight helmet and headphones. The gloves are the type E-1 that worked with the F-1 heated suit that this officer in 1943 would be wearing. A-9 gloves lie partially in the helmet.
(2-24)
(2-xx) vvvvvvvvvvvvvv vvvvvvvvvvvvvvvvvv

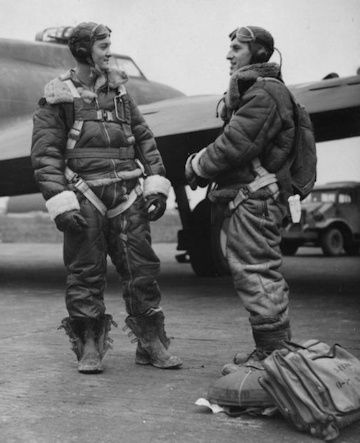
(2-xx) Shown above are 3 men wearing the B-7 parachute. All 3 men are from the 303rd BG. Left is Francis W. O'Reilly of the 359th SQ. Right Waist gunner (B-17F "Holy Mackerel"). Francis is wearing his M-1941 wool knit cap backwards. Photo dated Jan. 28, 1943. Concerning the top right photo. No date or ID on the men was found but looks like it was taken during the same period and maybe the same day. They're not wearing life preservers nor has any type of First Aid Kit been attached to the B-7s. The 2 men wear B-6 helmets, B-7 goggles, B-3 jackets, A-3 pants and A-9 gloves. Two men wear the 4 buckle over shoe. The 2 photos may been taken for potential press release.
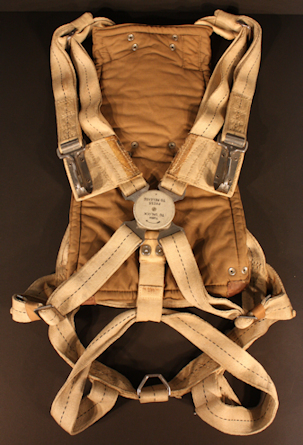
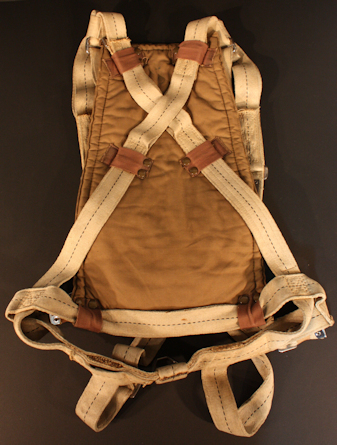
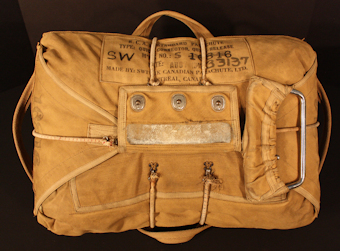
(2-xx) Shown above is the RAF Observer harness. Many of these were provided to the American Bomber crews. The 9h AF crews flying the B-26 also wore many of them. Don't confuse this harness with the American A-4 harness that showed up late in the war.The parachute shown below is dated Aug. 7 1942 and was made by Switlik Canadian Parachute , LTD. In the photo bottom right you can see the backside of the chute compared to the American A-3 parachute. Both parachutes could have, if needed, be interchangeable.

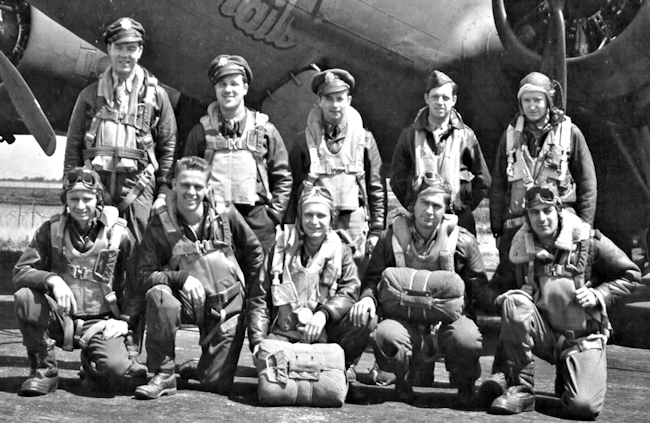
(2-xx) Shown above is the Victor J. Loughnan Crew of the 359th SQ, 303rd BG. Three types of parachute harnesses are used. The B-7 and the Observer harness, as shown above, and the American QAC harness for the AN-6513- 1a parachute. (Shown in great detail on this page) Two of the crew are wearing the RAF MK VII goggles and 2 others are wearing either the 6530 or B-7 type goggles.
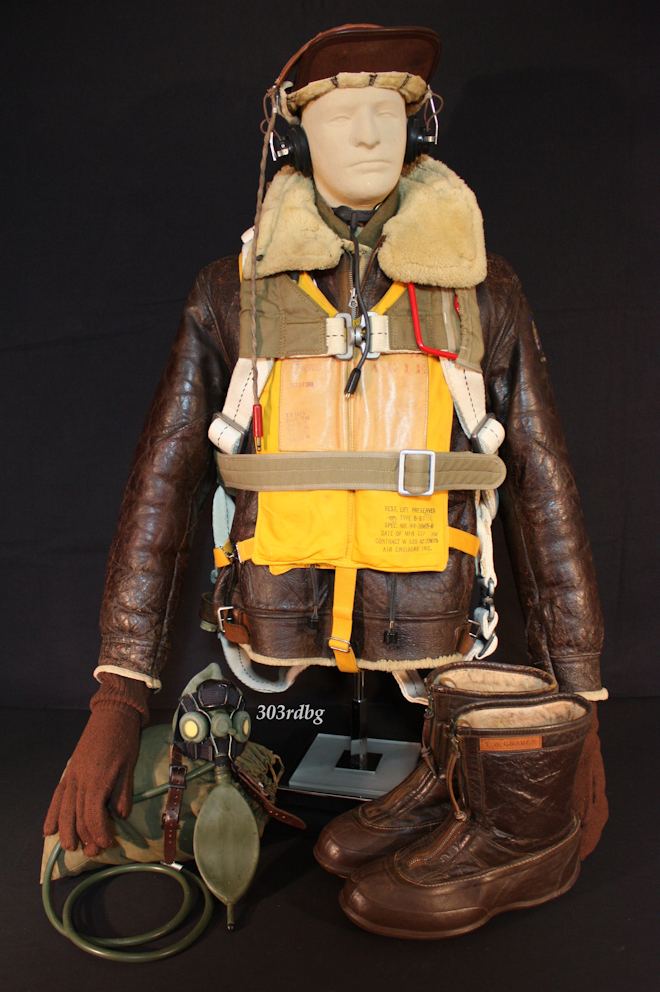
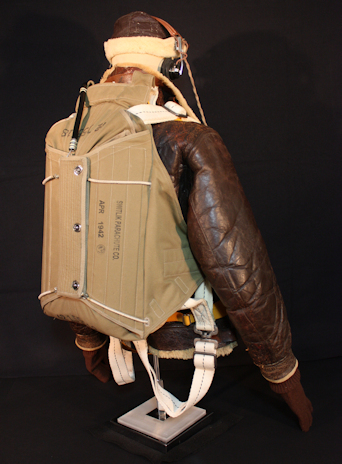
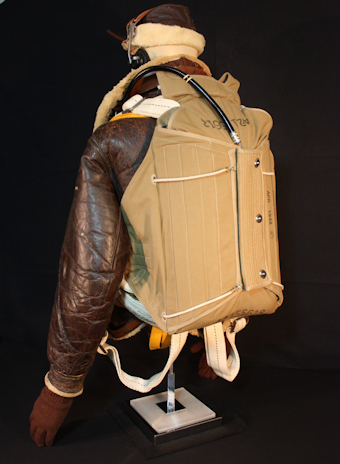
(2-19) Shown above is a close recreation of one of the men in the above photo of the Victor J. Loughnan Crew. (I will let you find the correct man) Worn above are the B-7 goggles, B-6 helmet, throat mic, A-2 jacket, B-3 life preserver, RAF Observer type harness and parachute as described above. The gloves are the E-1 type for the F-1 suit.
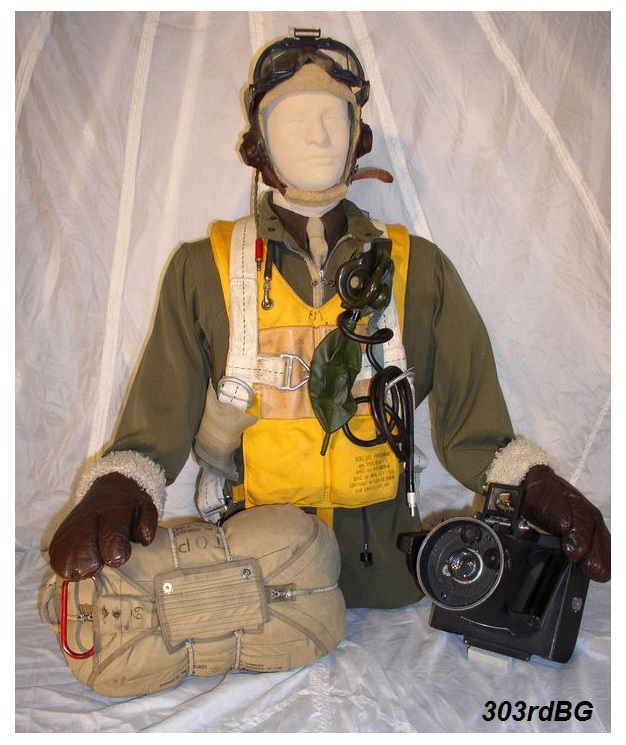
(2-20) The man above is based on several of the men in the Vere A. Wood Crew of the 427th. I was surprised to see this crew still equipped with the gear typical of 1943, with the photo dated March 29, 1944. The man above wears an A-4 under the B-3 Mae West. An unmarked QAC has a A-8b oxygen mask hanging in front of it. My mask shown is a postwar example. A good condition wartime A-8b is extremely rare. The B-6 helmet is under the Mk VII goggles. He has A-9 gloves, the AN-6513 1a parachute, and across from it the K-20 camera. You can see the K-20 camera in the hands of 2Lt Wilson in the Lead Crew photo for Mission 142.
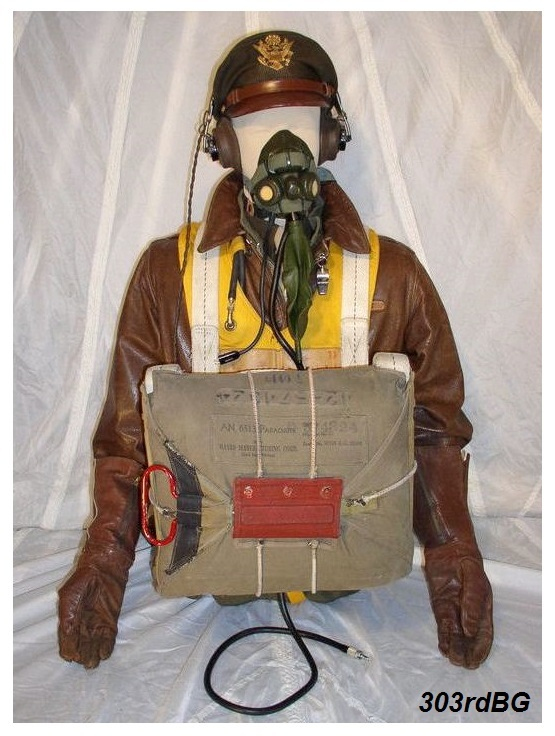
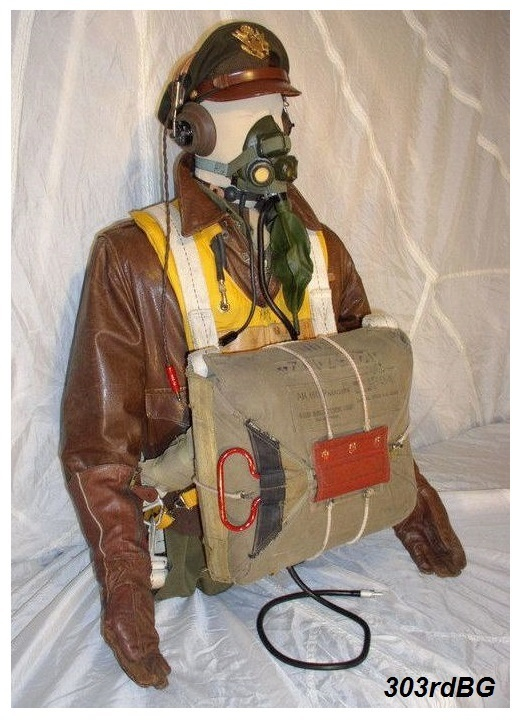
(2-22) This is the classic look of the early days. The A-2 over the dark green A-4 suit with headset over the crusher. R.A.F. 1941 pattern gloves cover the hands and an early AN-6513 chute is attached to the QAC.
(2-23) vvvvv

(2-26) Shown above is another example of the B-3 jacket. This particular model has the more desired 2 tone leather for the pocket, trim and added shoulder pieces.
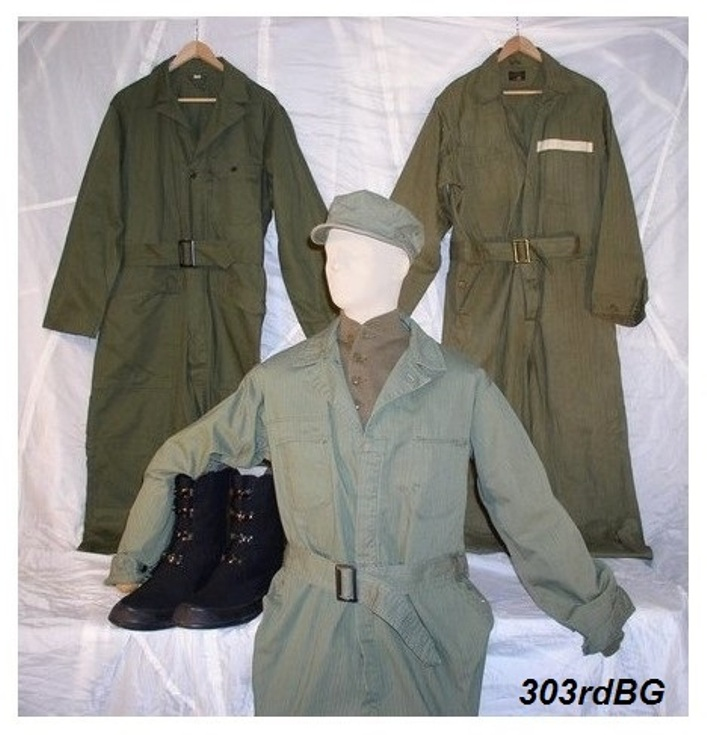
(2-27) Above are two examples of the HBT coveralls worn by the ground crew . The short billed HBT hat shows on the mechanic who has the 4 buckle overshoes under his right arm. The other suit hanging on the right is the early AAC B-1 flight coveralls. It should be pointed out that some of the aircrew at times would wear any of the HBT coveralls.
(2-28) Shown above is the D-1 jacket and B-2 cap worn by many of the ground crew and support personal. Sometimes the jacket will have pockets. The D-1 weighs about half that of the B-3.

Above is an original WWII Safety Poster reminding pilots in training of the many mistakes new pilots make. All of the posters are 17 X 22 inches in size.
| The uniforms and gear presented here are from the private collection of Ed Nored. Any reproduction or other use of these copyrighted photographs is strictly forbidden. 303rdBG.com was granted exclusive rights to these photographs solely for historical purposes. The items shown are not for sale. |