 |
WWII Uniforms / Flight Gear Ed Nored Collection |
Personnel
Mission Reports
photos copyright ©2006-2018 by Ed Nored, used by permission
Flight Gear 1944-1945 / F-3 Heated Suit
Parachutes 1943-1945

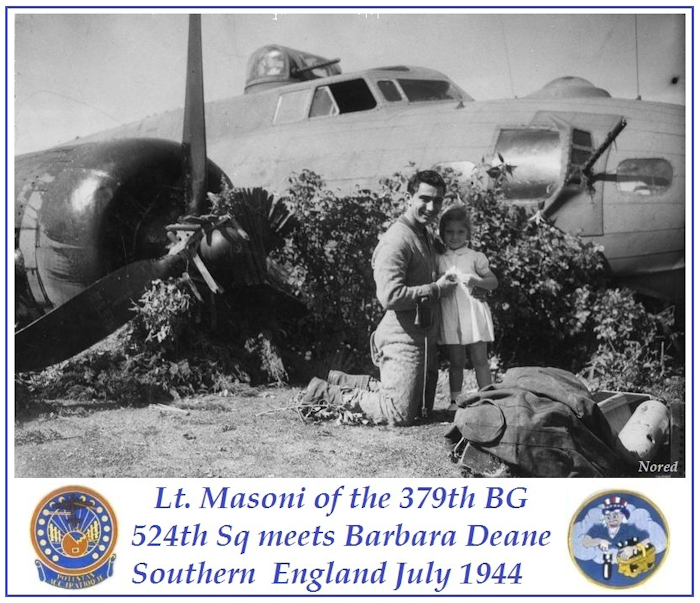
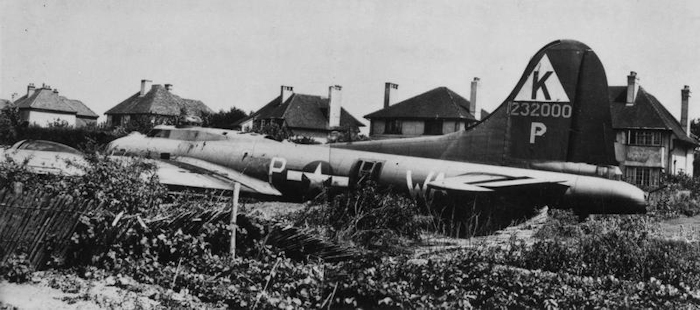
(6-xx) Shown above is a Offical Press Photo dated July 18 1944. ENGLAND---BARBARA DEANE GREETS LT. MASONI, NAVIGATOR FROM NEW YORK CITY, AFTER HE AND THE CREW MADE AN EMERGENCY LANDING IN BARBARA'S GARDEN IN SOUTHERN ENGLAND. THEY WERE RETURNING FROM A RAID ON NORMANDY TARGETS WITH 2 OF THE FOUR ENGINES KONKED OUT. THE PLANE WAS FORCED TO BELLEY LAND WITH SEVERAL MEMBERS OF THE CREW WOUNDED BY FLAK. (END )In the press photo above Lt. Masoni is wearing the F-1 "blue bunny" heated suit and A-6 flight boots. One of the aviator kit bags is clearly seen in the foreground. Note the engine of the B-17 is clearly one of those shut down while in flight. You can see oil over the cowling and the prop has been feathered. Note that the small wooden fence around the garden has been scooped up and lies draped over the hub of the propeller. I'm sure the people living in the neighborhood never forgot this event.
Just for fun this is how a Hollywood director would shoot this scene: "A young girl playing in the garden with a small dog. She's singing some silly little song to herself. (camera is shooting her from the right) The dogs slowly turns around and starts barking. The little girl asks " What's wrong Churchhill?" The camera dollys around and we see the girl head-on and in the background is the smoking sputtering bomber. The camera dollys more and we see the girl from the left and in the background the houses, the girls mother dropping something and running to her yelling her name. The camera dollys back to a full frontal of the girl, dogs still yapping, now you see the plane very close and beginning to set down. The girl hears her mom, looks at her dog and then turns around to see this giant dragon of a plane hit the dirt . The remaining spinning props chop there way into planet earth, struggle to keep turning and then stop. The girl cant hear the dog or her mother. The sight is deafening. She's frozen. All that metal sliding and plowing forward through the garden fence and finally coming to a halt. The dust cloud sweeps over the scene. The mother stops, blinded by it all. The dust is settling and now the camera shooting from the right of the planes plexiglass nose slowly dollys in . The dust is gone and we see the bombardier lift a hand and do a curl of the fingers to wave hello to the very little dusty girl standing 12 inches from the nose of the plane who tries to return the wave.
(6-xx vvvvvvvvv vvvvvvvvv
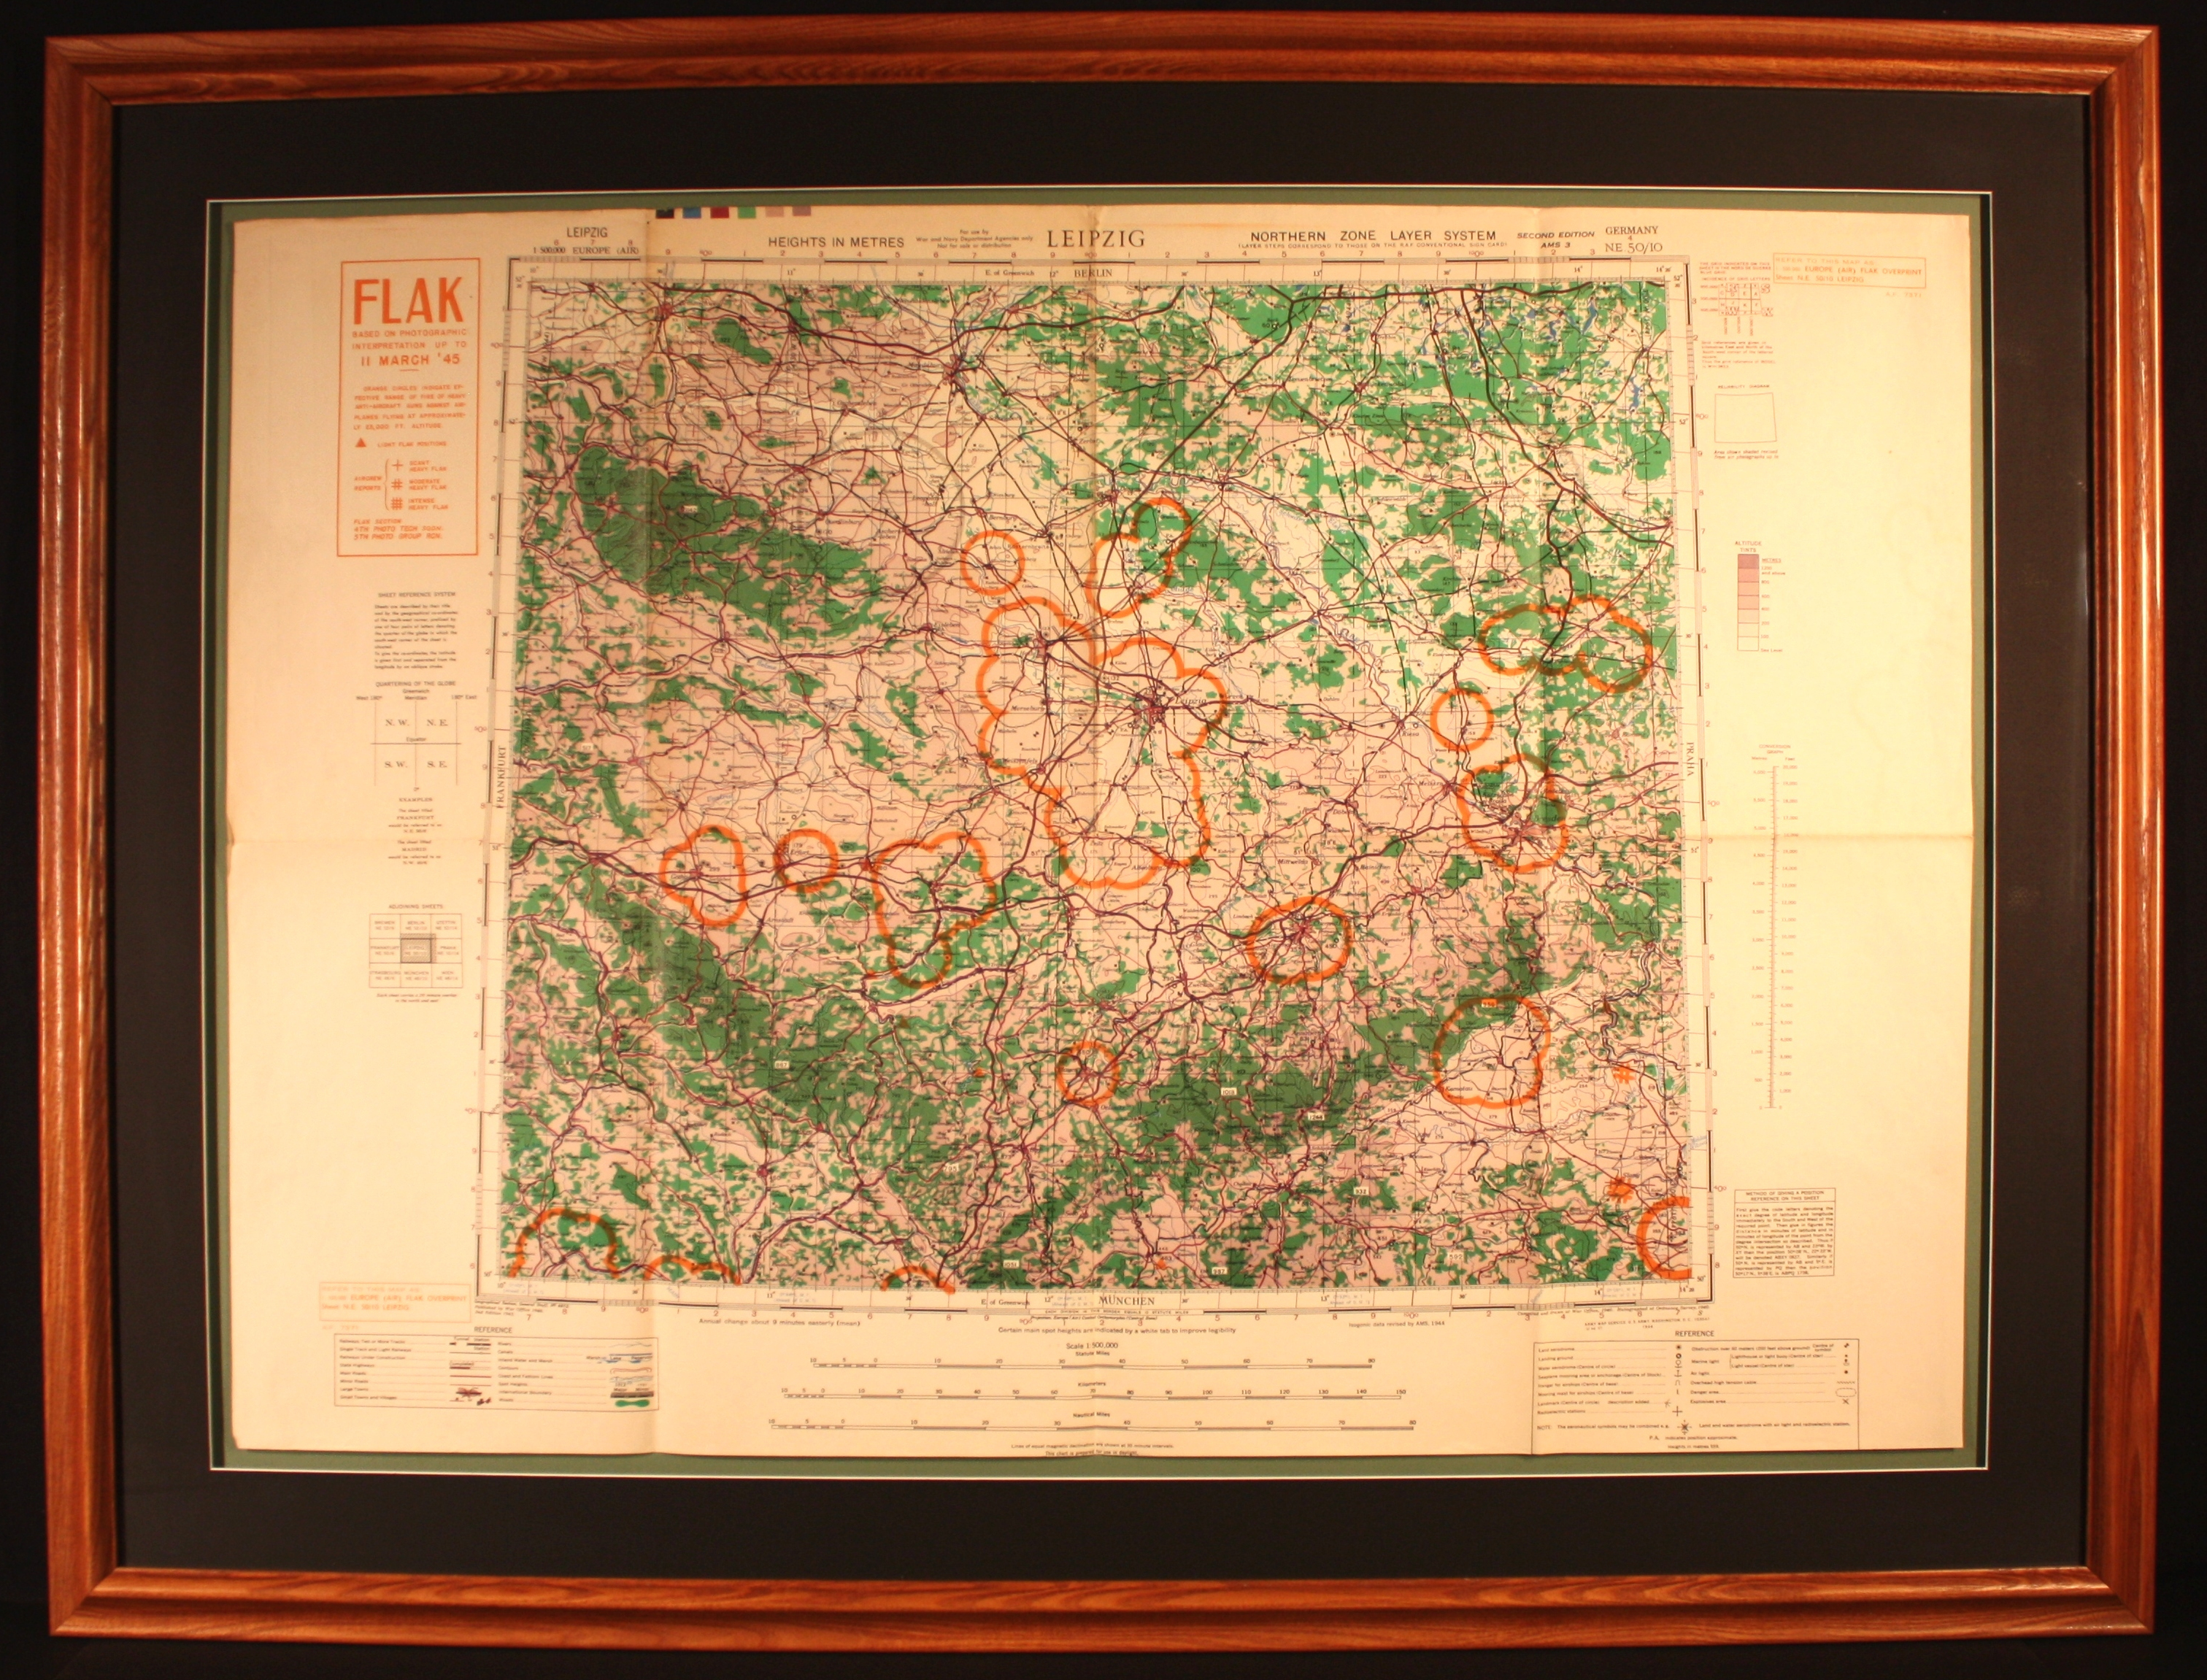
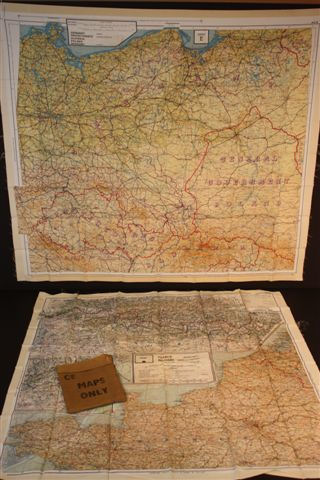
(6-xx) Shown above is an authentic FLAK MAP dated March 11, 1945. The areas circled in orange are areas, based on earlier intelligence, that pose serious threats of encountering anti-aircraft fire or "flak" as it was referred to. Many veterans brought back pieces of flak that hit there plane. The navigator would have had this map. In the center of the map is Leipzig. Off to the right is the city of Dresden. (click for a larger image)
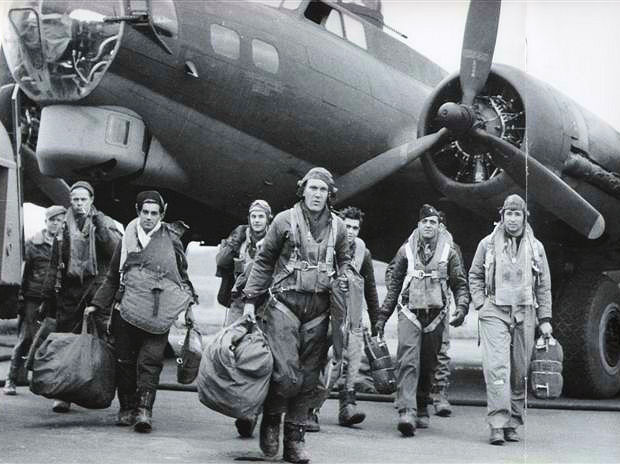
(6-1) Shown above is a widely used photo of a bomber crew walking from their B-17. There are 10 men in the photo. The man on the far left looks like a mechanic. The kit bags are bulging with equipment and three flak vests can be seen. Most men have the QAC harness for the AN-6513 1A parachute. The man on the left with a flak vest over his shoulder has an RAF harness and RAF parachute. The man with the C type helmet has the zippered first aid kit tied onto his harness. See the kit bags and flak vests in following photos.
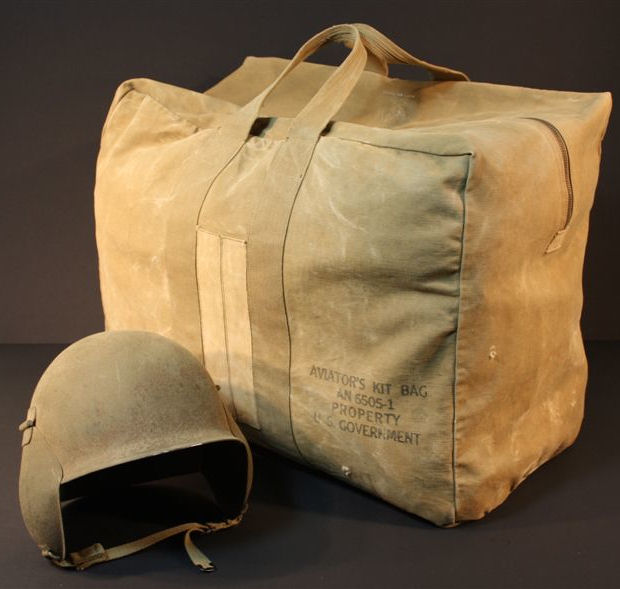
(6-2) Above is the Aviator's Kit Bag. The M-3 Flak helmet is shown for scale.
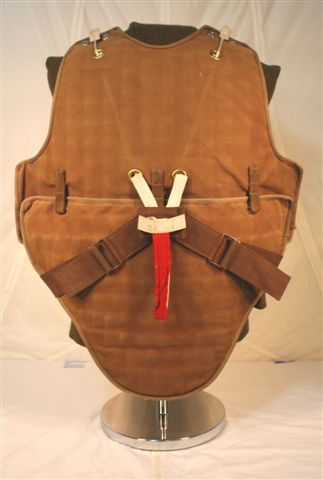
(6-3) Shown above is the M-1 vest with an M-3 apron. This apron design was to accommodate crewmen who had a sitting position in the plane. In my example shown above, the back has armor in it. According to C.G. Sweeting's excellent books, if there was no armor in the back of the vest it would be an M-2 vest. Like the vest shown below, all you have to do is pull the red strap up front and the vest falls to floor of the plane.
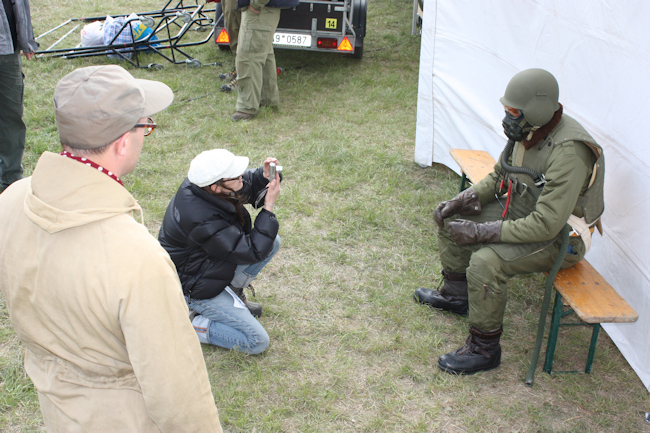
(6-xx) Ali kneels down to take a photo for maintaining "continuity" purposes. I bought the Flak helmets for them and I had Toppots restore them. They did a great job. The gear worn by the crewman is all authentic except for A-6A boots, B-10 jacket and the parachute harness. (Red Tails photo by Ed Nored, Copyright © Lucasfilm)
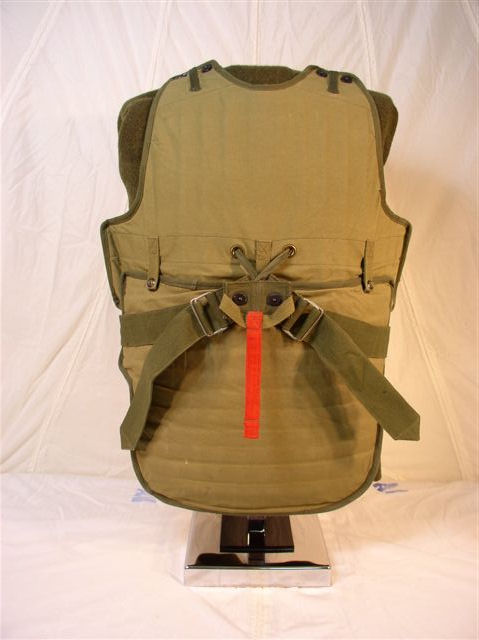
(6-4) Shown above is the M-1 full armored vest with the M-4 apron. The red strap shown is the emergency pull release. In one quick pull it disconnects the shoulder connections and the waist belt.

(6-5) Shown above are the 3 armored vest pieces broken down. The vest was made of small 2 inch squares of manganese steel plates.
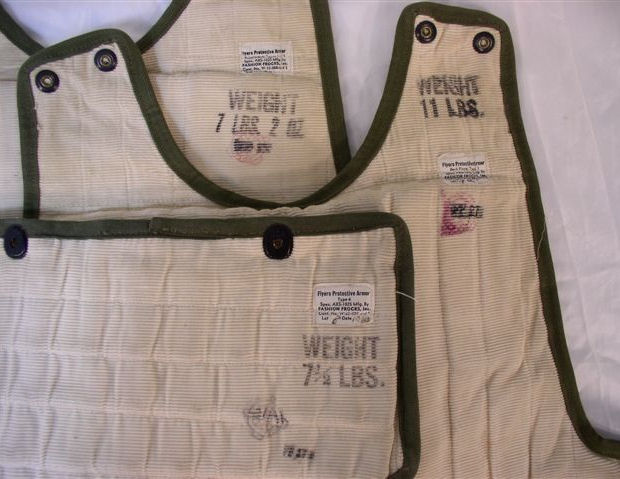
(6-6) Shown above are the manufacturer's label on each piece. Also the weight of each piece is clearly stamped. Total weight 25 lb 10 oz! This vest was made by Fashion Frocks, Inc., who made quite an array of items for the war, including parachutes such as the AN-6513-1a. See an example on page 2.
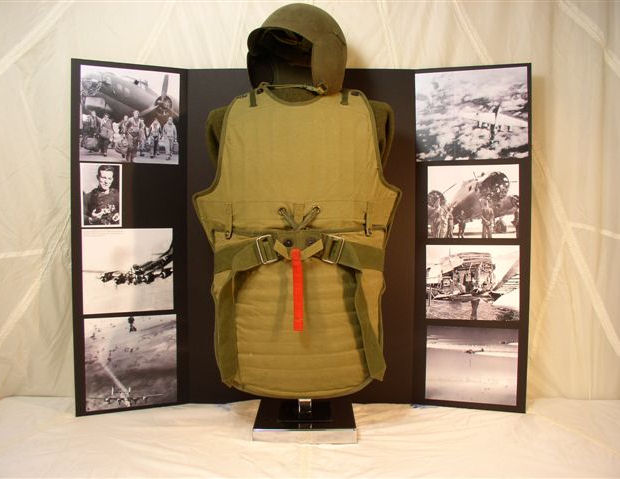
(6-7) The above shot is posted more as a tip on how to display objects if you are a collector. Shown in the background is a foam core foldable display board I picked up at the local Office Depot store. They come in black or white. I photocopied some photos from different sources that show flak and flak damaged planes. In the top left photo there is a crew walking away from their B-17. One crewman is clearly shown carrying the same flak vest. The black color contrasts with the vest to make it stand out more and the photo authenticates the item displayed. The M-3 Flak helmet sits on top.
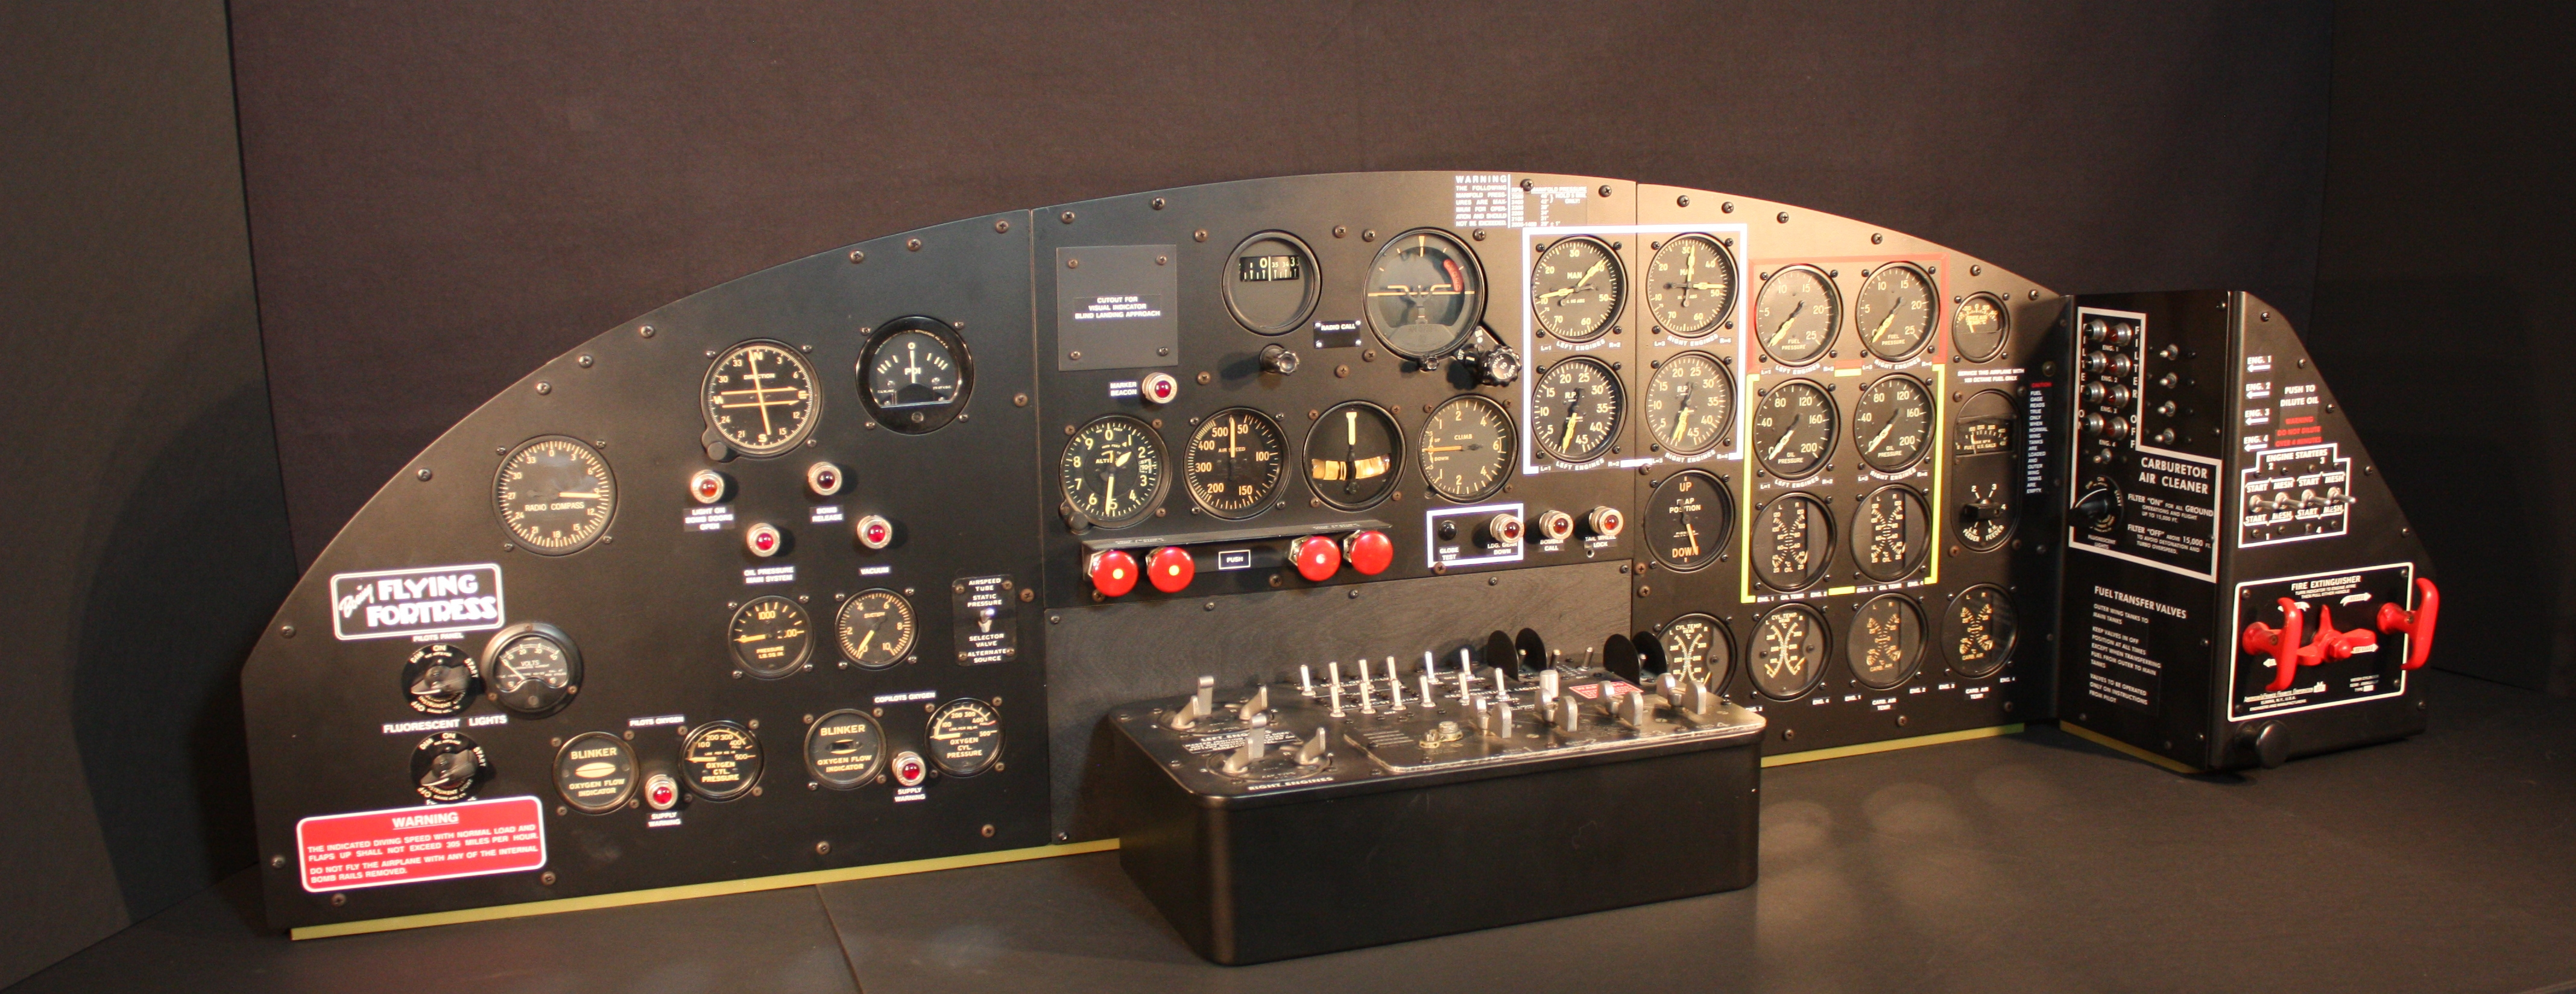
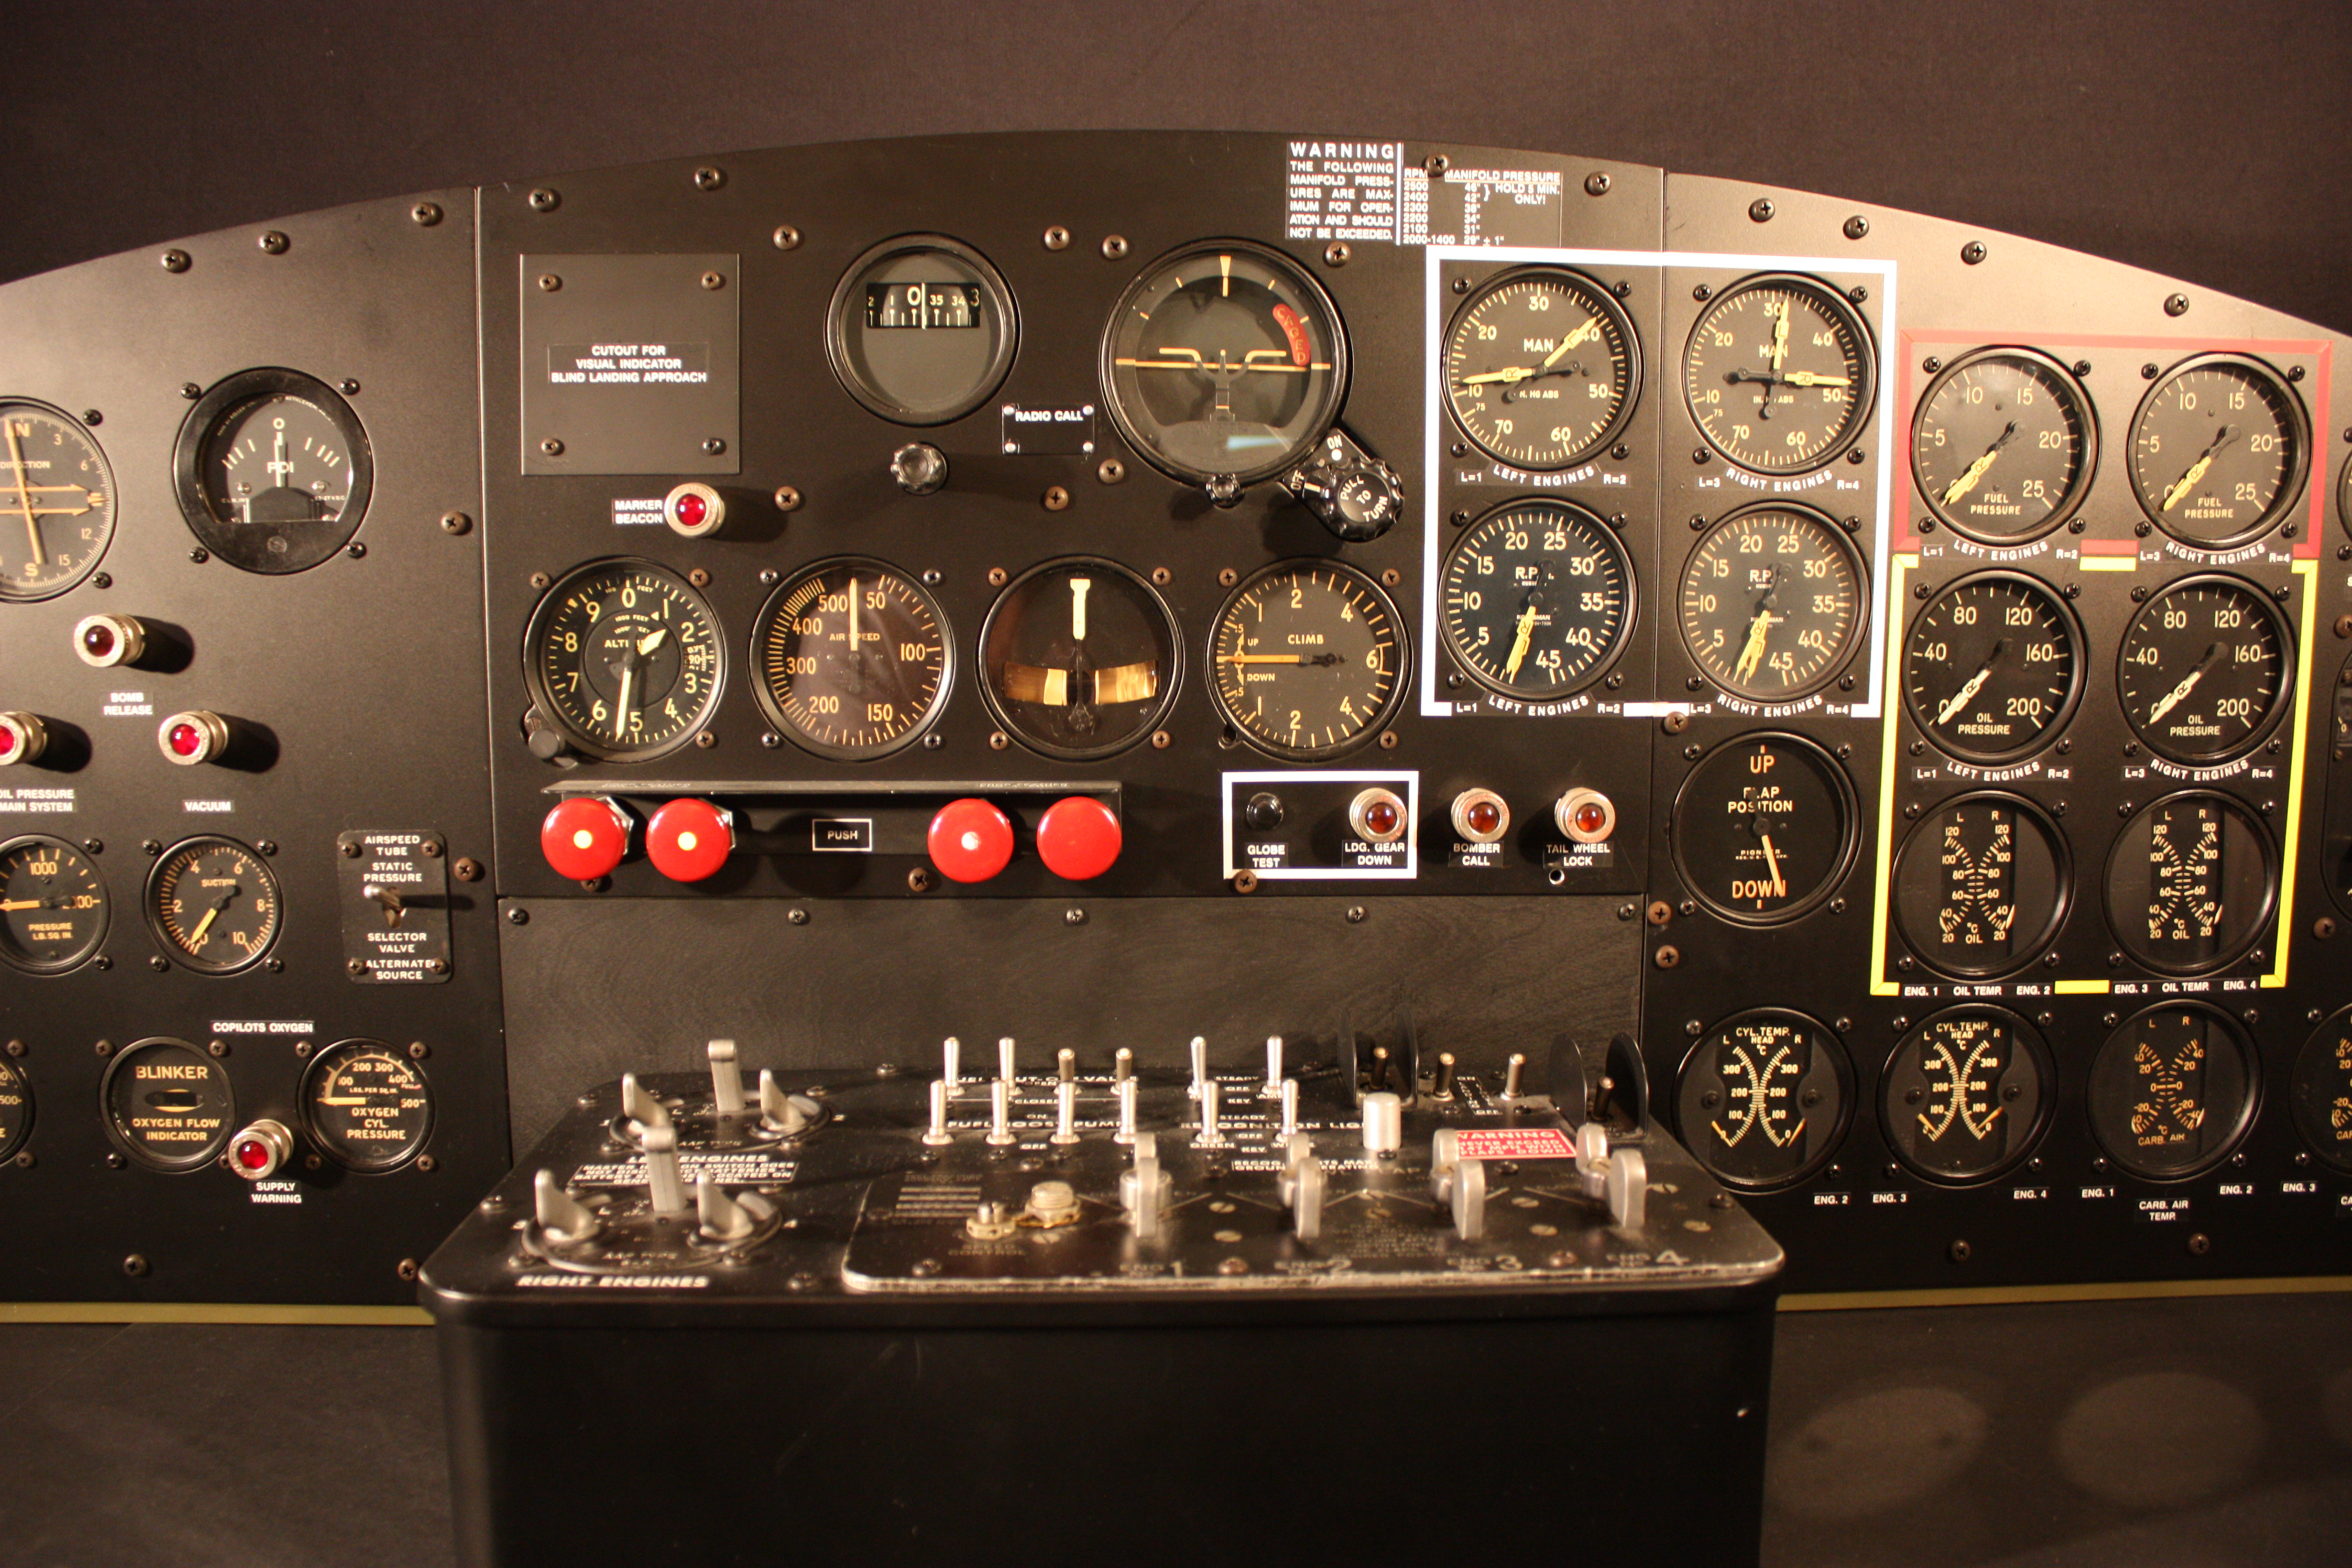
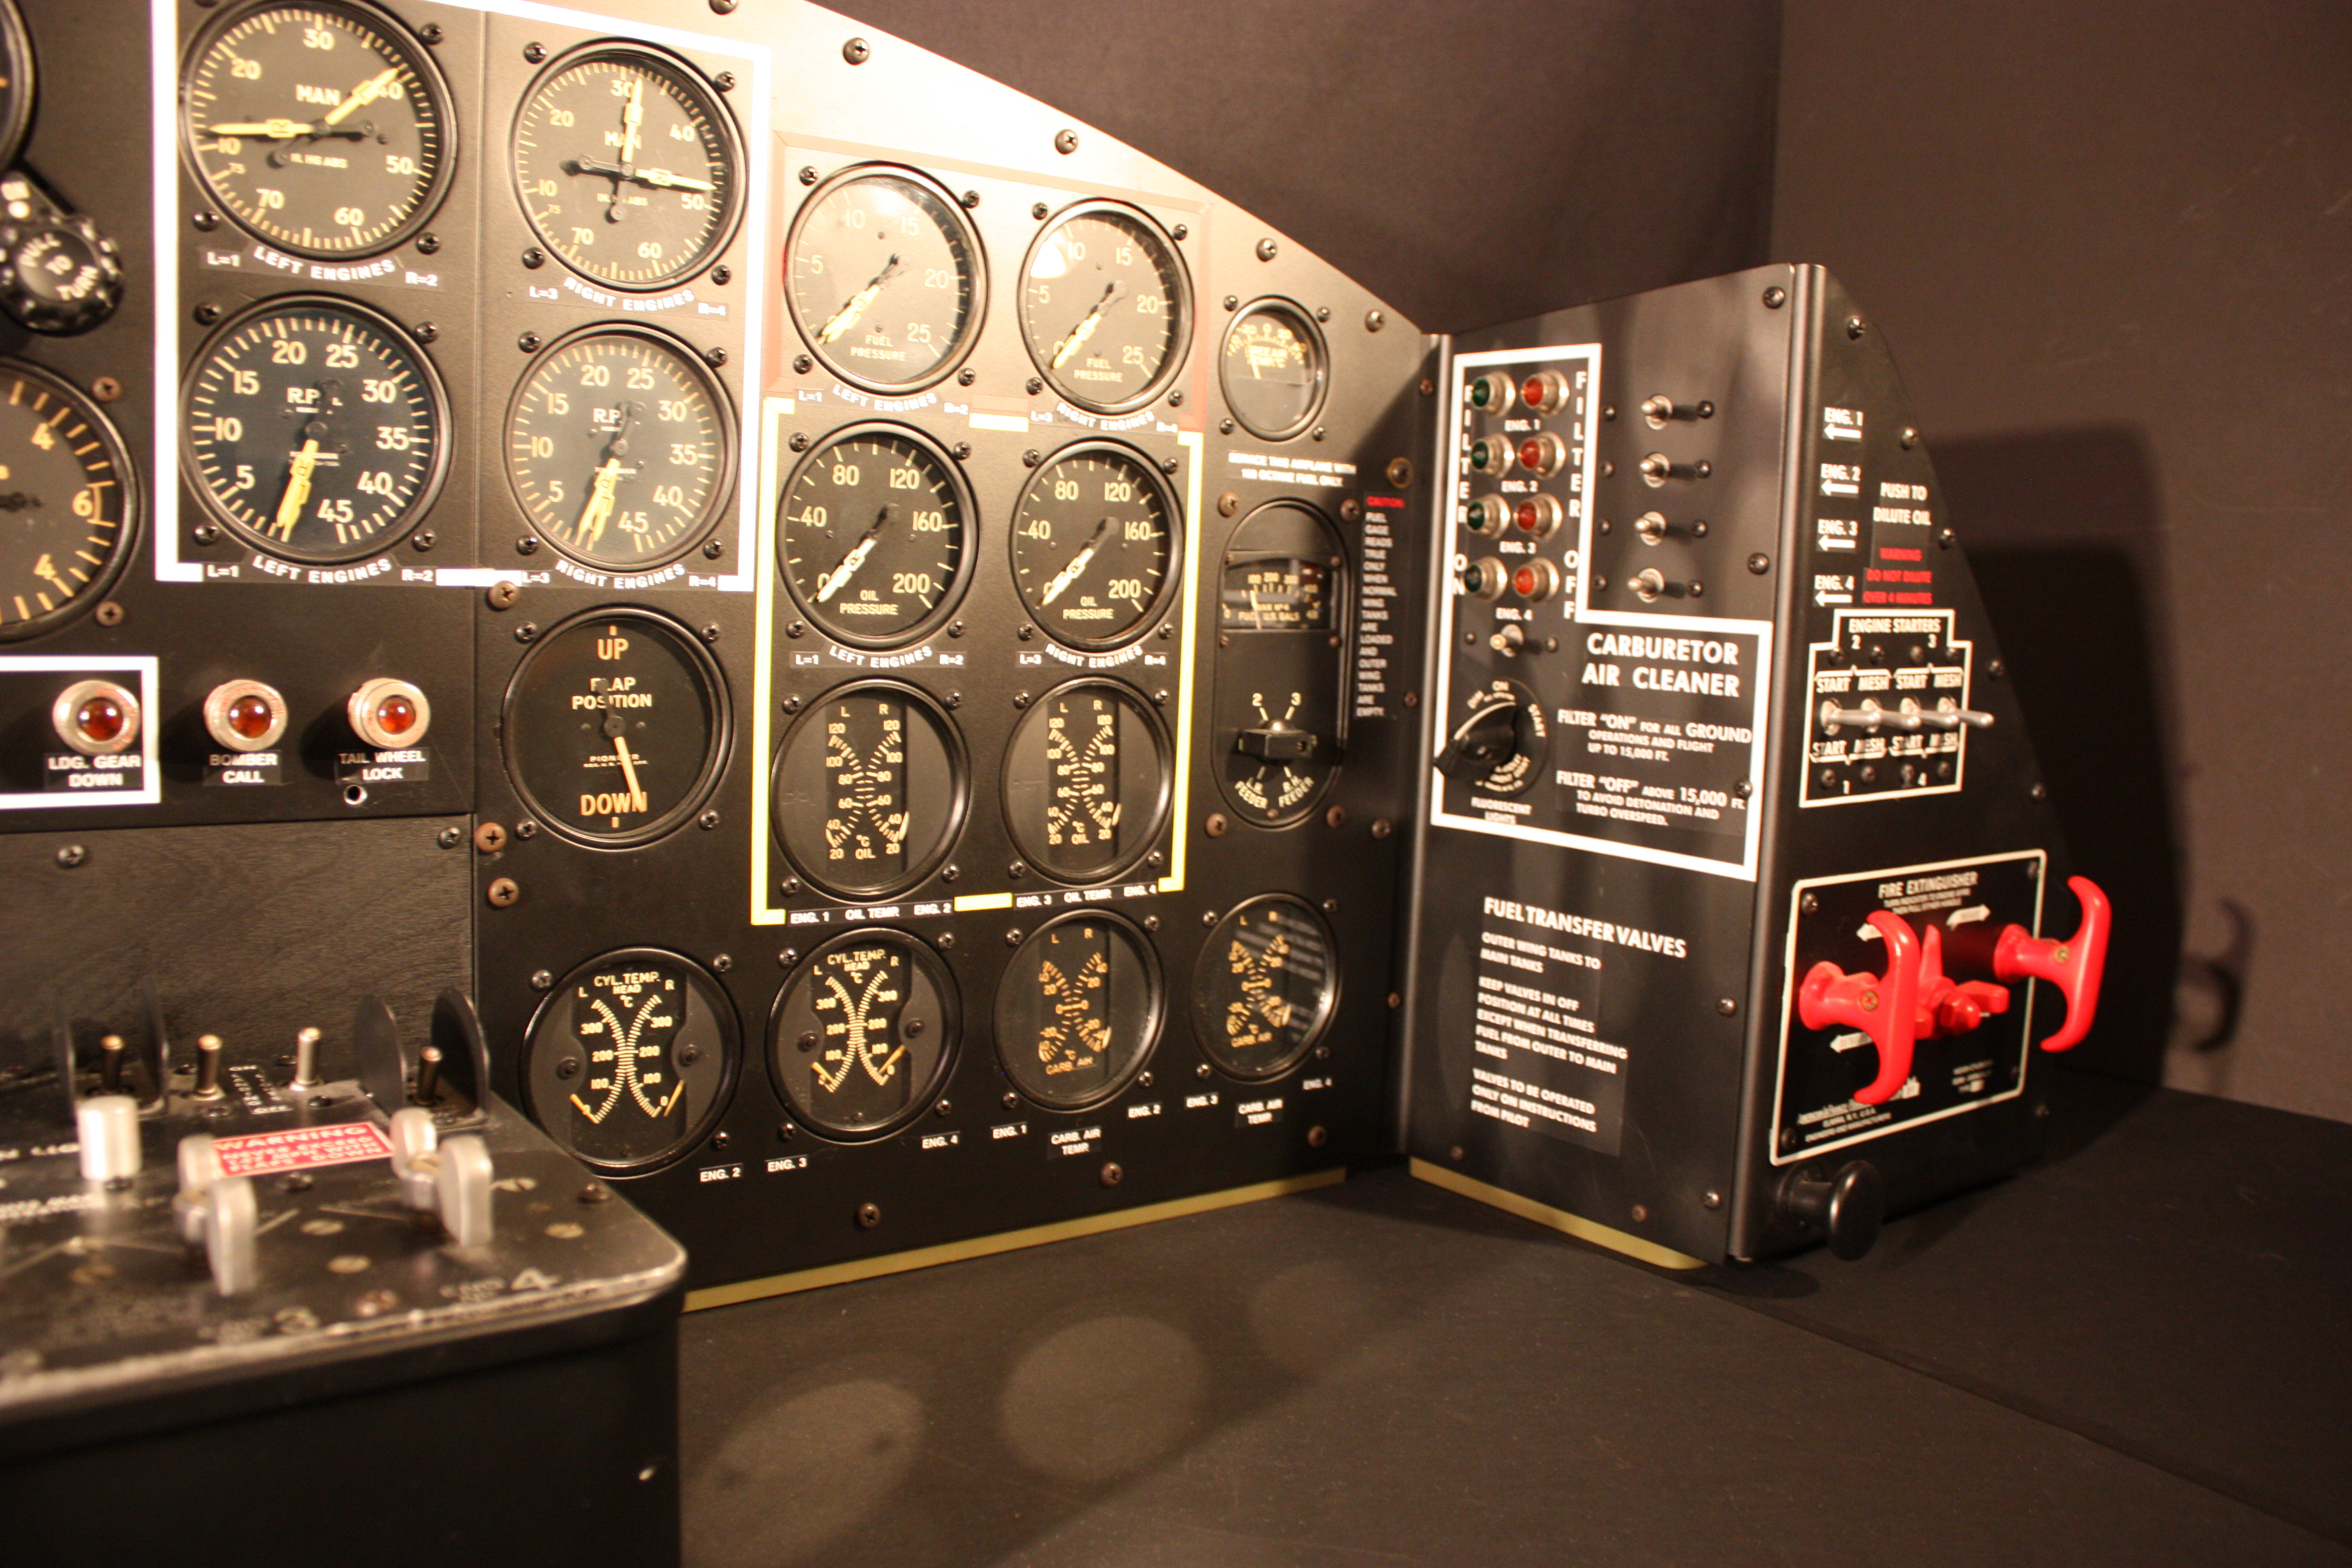
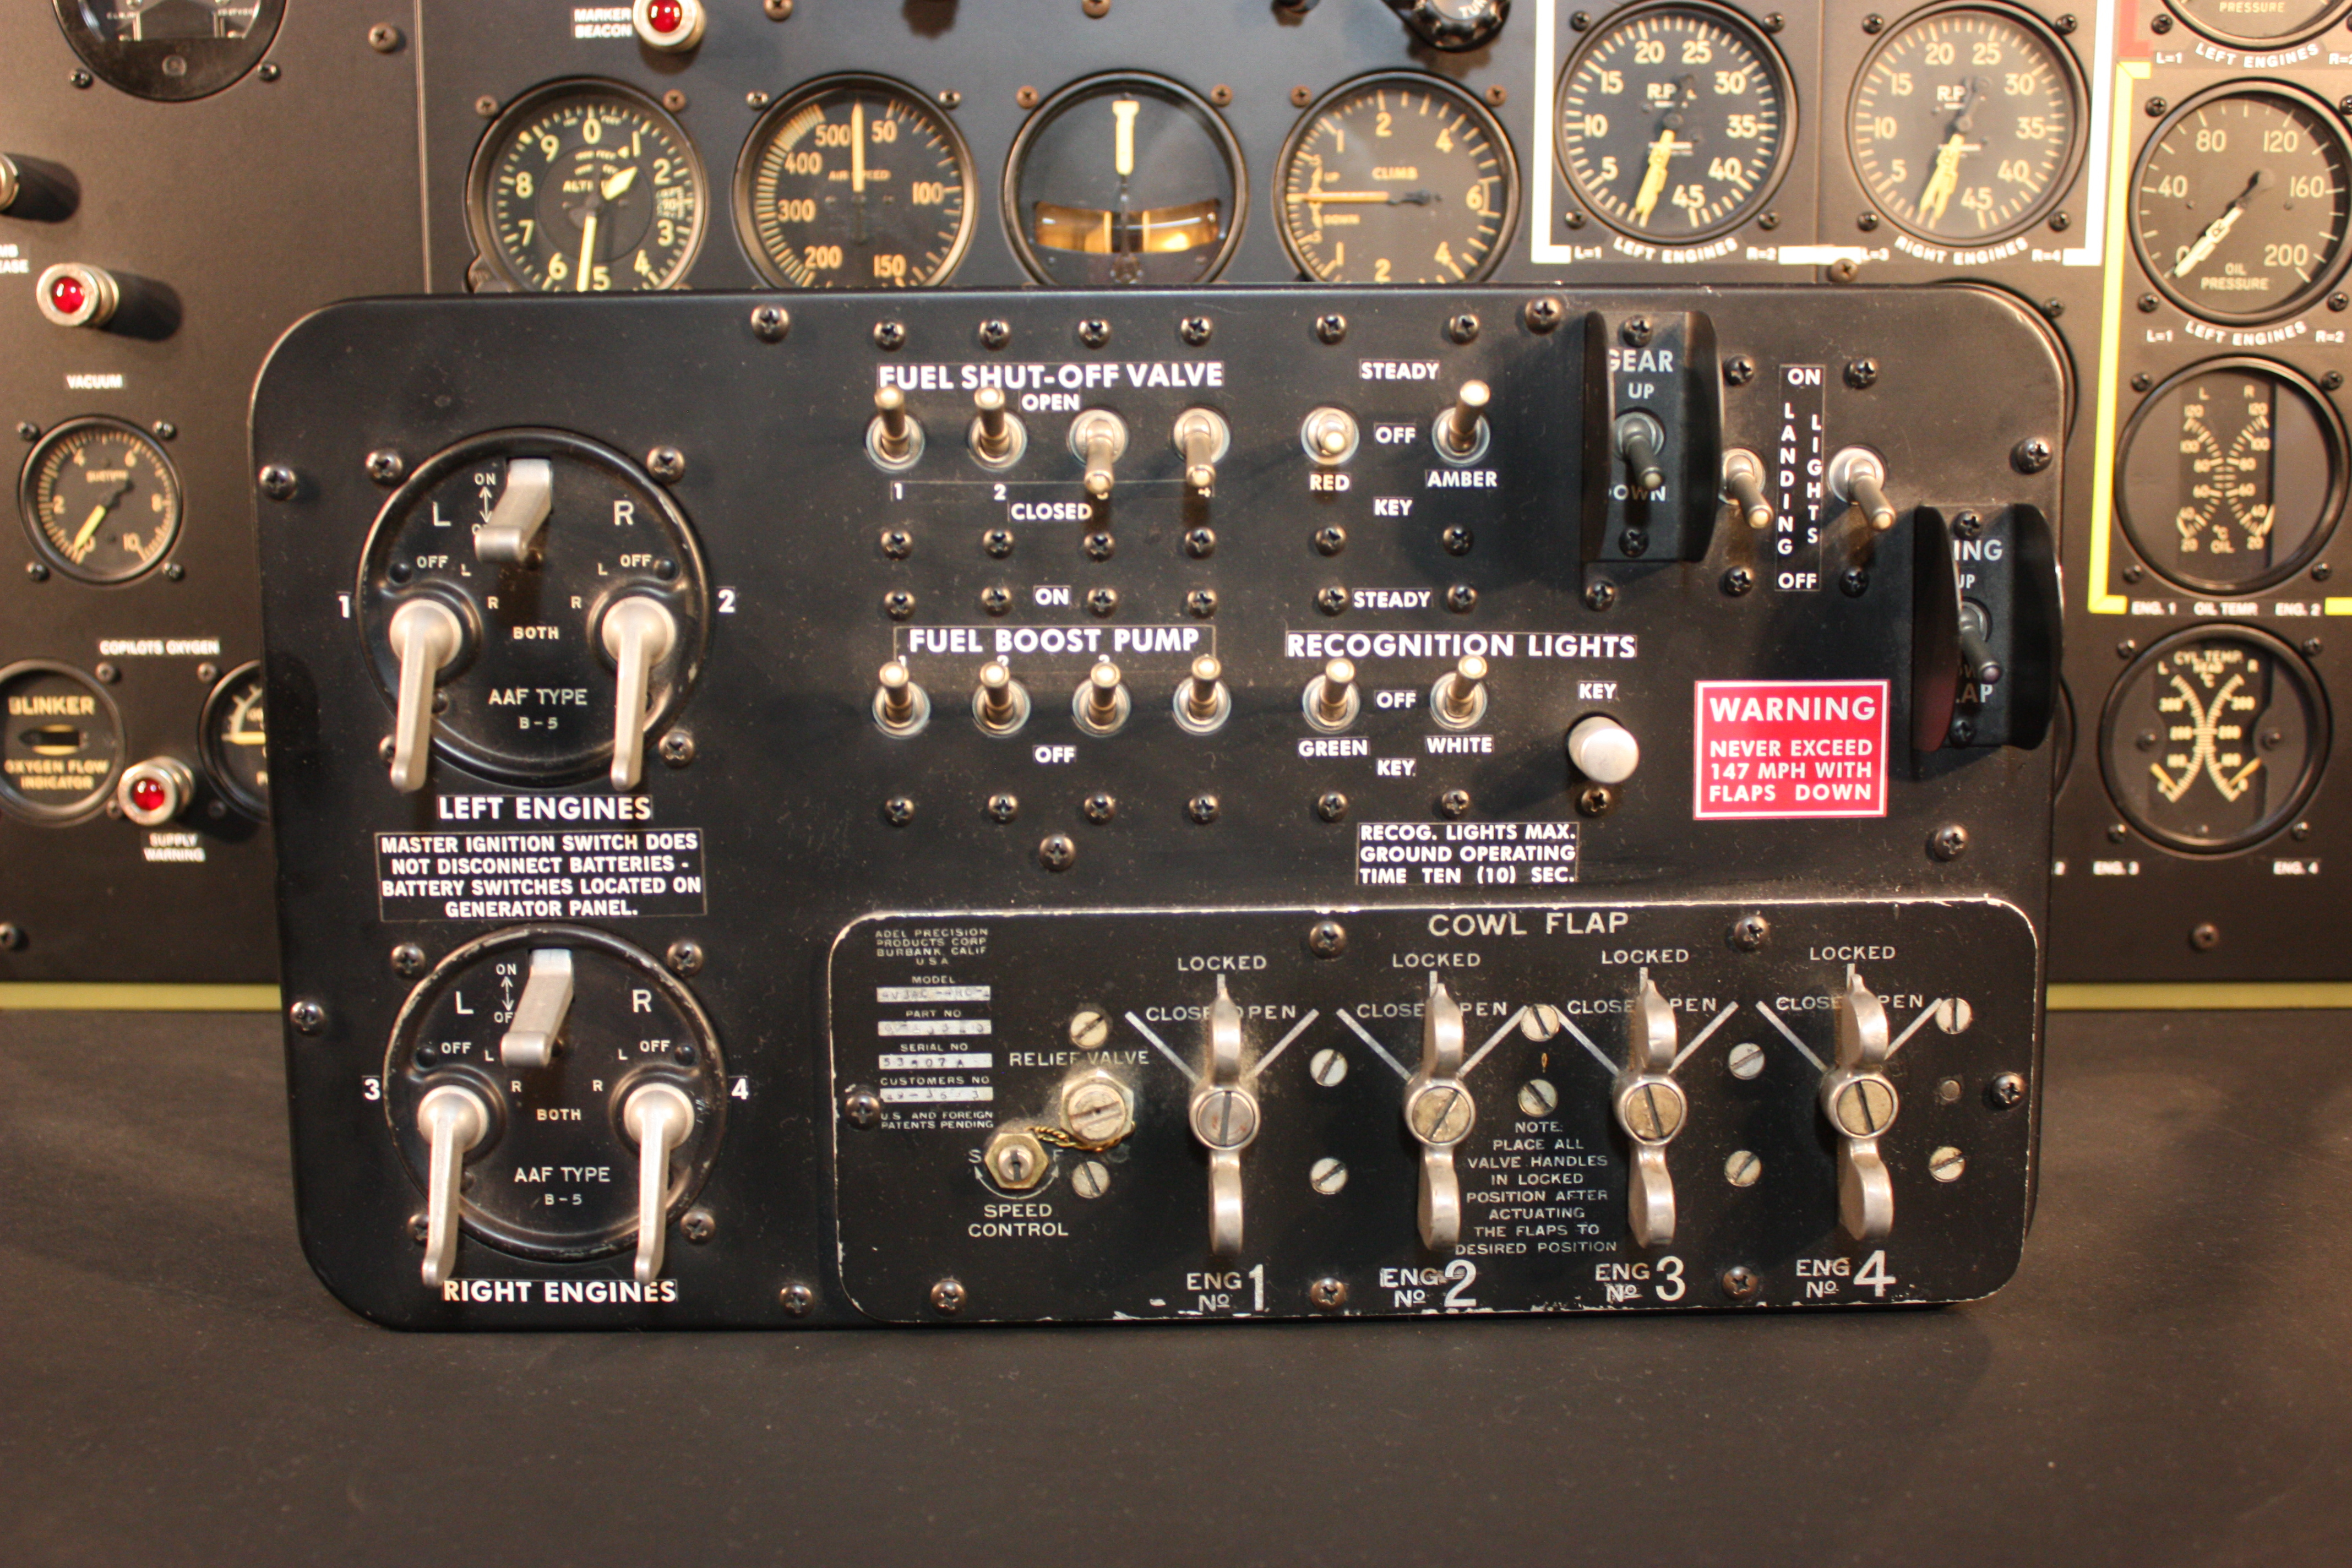
(6-xx) Shown above is a reproduction of a B-17G model instrument panel. The main panel and the two auxiliary panels were cut from aluminum and powder coated for a durable finish. The lettering was copied from photographs of actual cockpit panels which were in WWII Production aircraft. All of the lights, switches and instruments except for one is original. The faceplate of the C-12 altimeter contains an authentic reproduction of an original. Also the 3 red handles located to the far right had to be reproduced or copied from orginals. These are the fire extinguisher handles. (click image for a larger view)
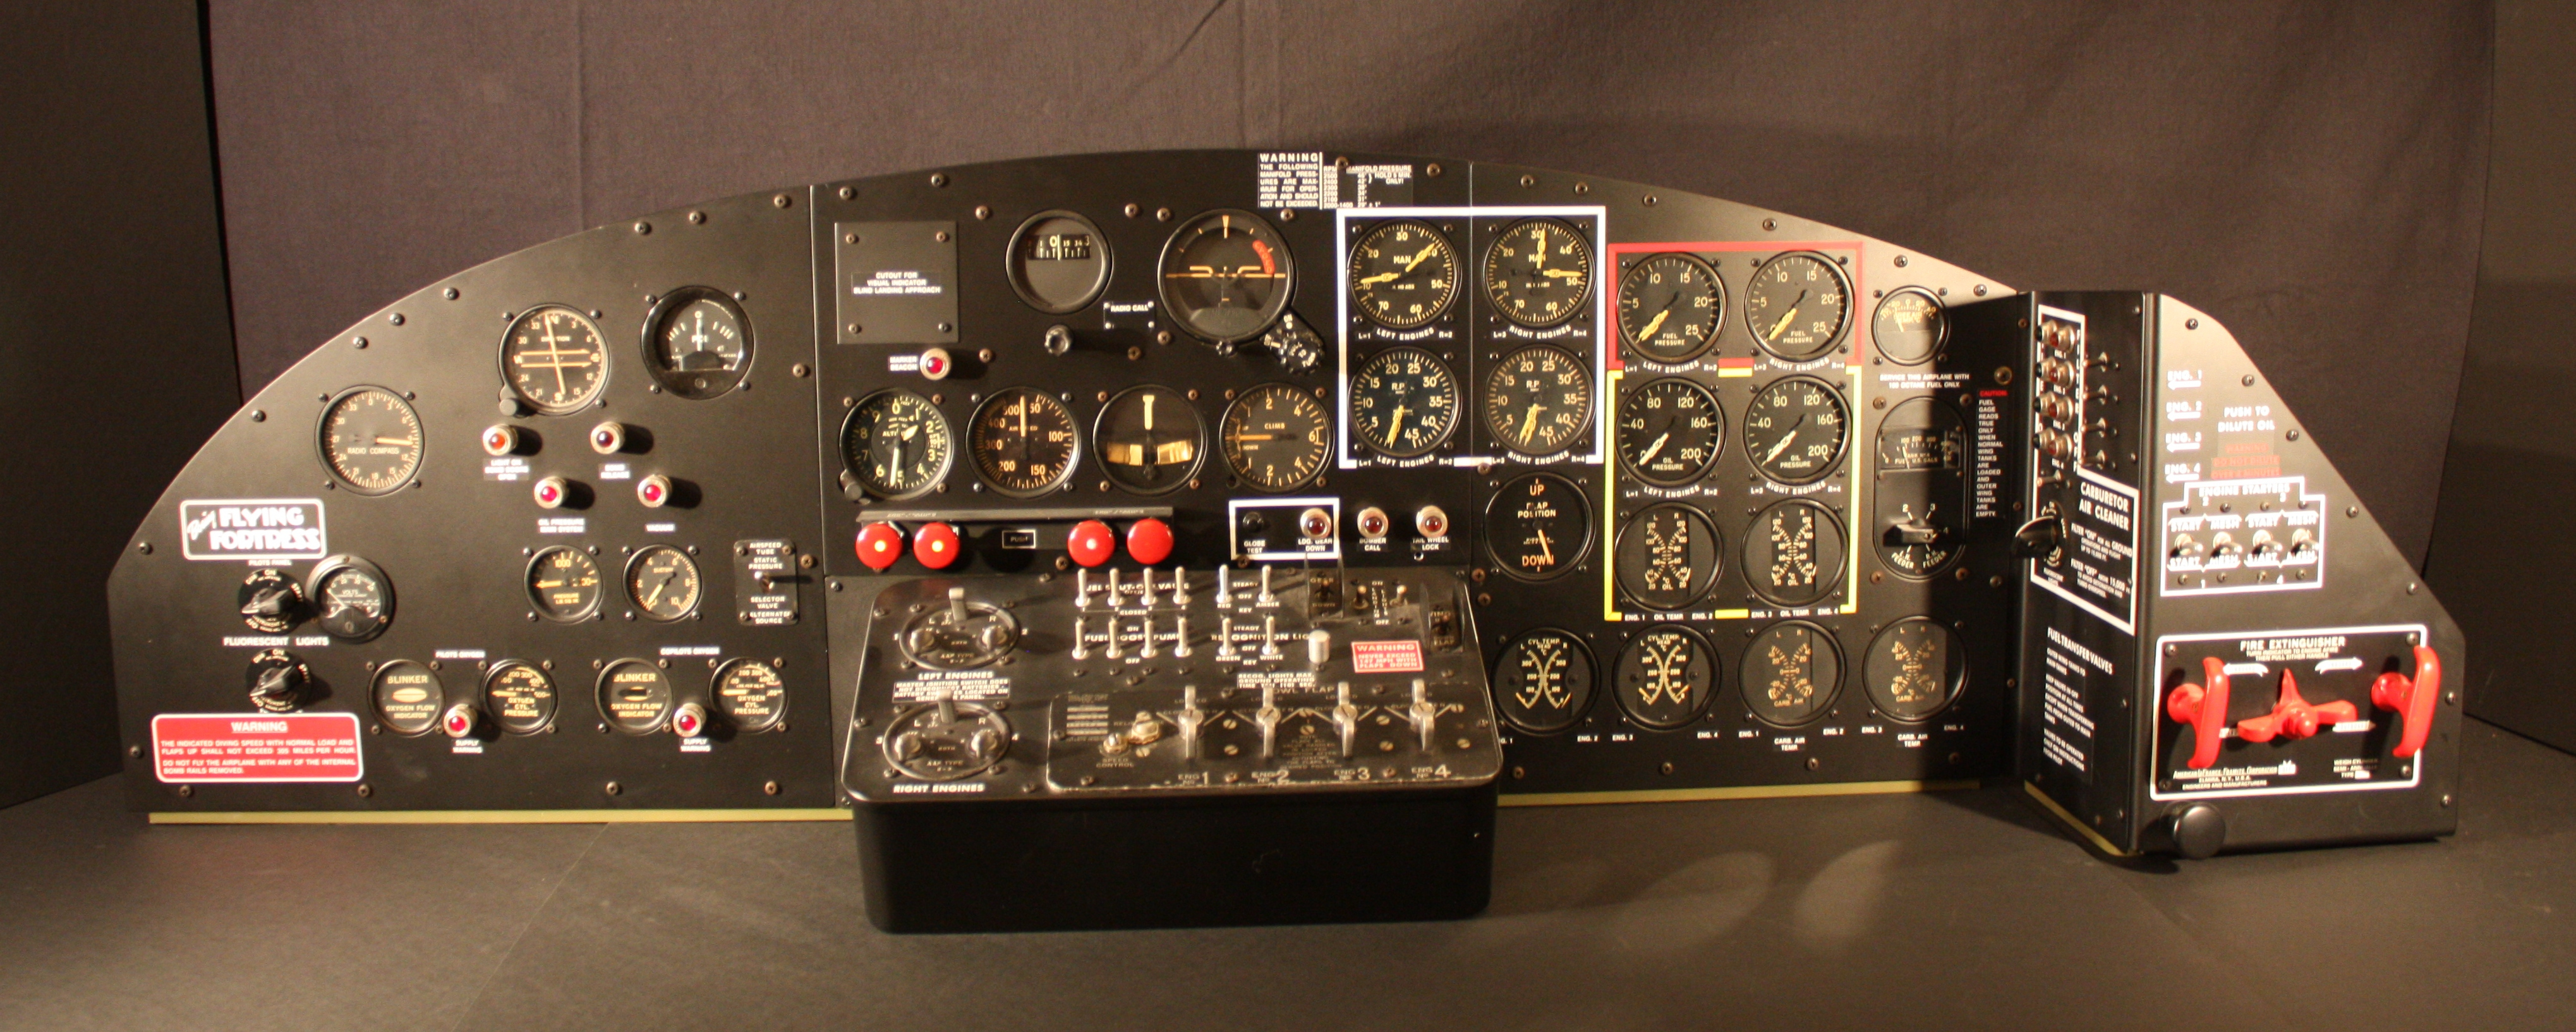
(6-xx) B-17 Instrument Panel (click image for a larger view)
(6-xx) B-17 Instrument Panel (click image for a larger view)
(6-xx) B-17 Instrument Panel (click image for a larger view)

(6-xx) B-17 Instrument Panel (click image for a larger view)
(6-xx) B-17 Instrument Panel (click image for a larger view)
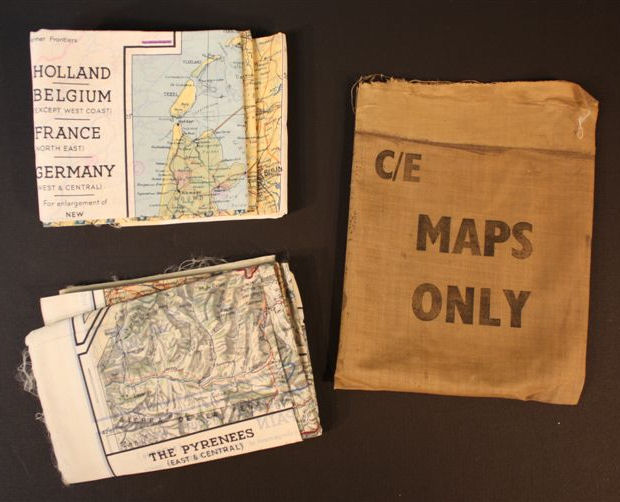
(6-8) Shown above and below are the maps issued in survival kits issued to flight crews. They are printed on a rayon material and are of excellent quality. They have maps printed on both sides. As shown above, they fold easily and come in the pouch measuring 7 by 5 1/2 inches. The pouch is made of the same material the parachute first aid kit is made of.
(6-9)

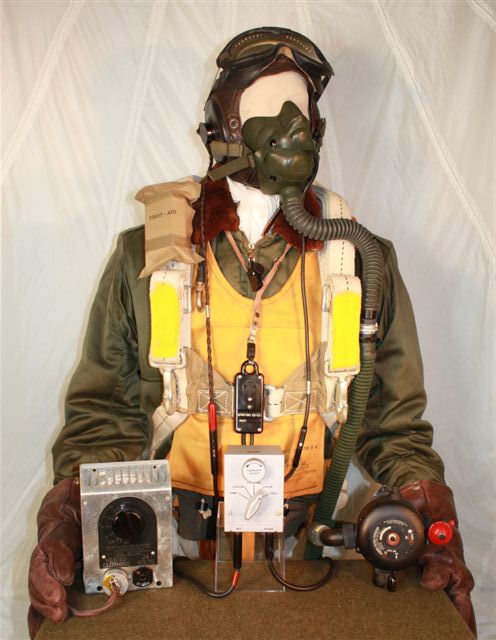
(6-10) The above photo shows a crewman as if he has been called to aid a fellow wounded crewman. He has disconnected all of his heat and communication lines and has grabbed what they call a "portable" or "walkaround" oxygen bottle; Type A-4 with an A-13 regulator. With flak shrapnel still filling the air around his plane, he takes no chances and connects his AN6513 1-a parachute to one side of his harness. He has grabbed a first aid kit from the fuselage of the plane and moves with much anxiety to the wounded man's position hoping it isn't that bad.

(6-11) Shown above is another example of a portable oxygen bottle; Type D-2 with A-13 regulator.
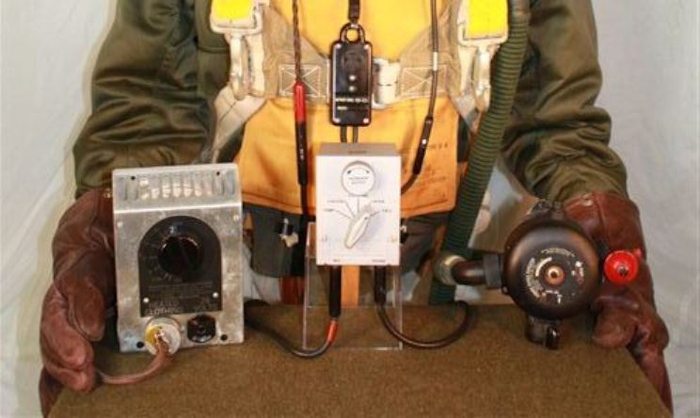
(6-12) Shown above are the three items the B-17 and B-24 crews had to plug into. On the left is the Rheostat for the heated suits. There are about three different patterns or styles of the rheostat found today. The one above I believe is one of the earliest ones. In the middle is the Jack box BC-366 that the 2 commo lines plugged into. Far right is one of the several styles of oxygen regulators. This one is the A-12. The A-3 parachute harness is authentic and is made by the Cambell Company. The yellow markings are authentic and are not as bright as my photo suggests.
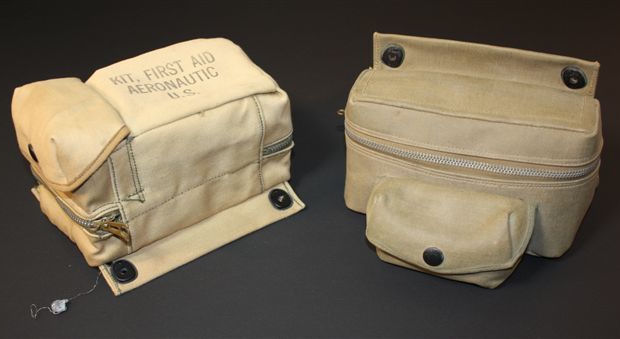
(6-13) Shown above are 2 examples of the aeronautic first aid kits installed in aircraft. The one on the right shows up in some photos of fighter pilots sitting in their cockpit. The first aid kit can sometimes be seen directly behind the pilots head fastened to the armor plate. This kit is the rarer of the two to collect. The kit shown on the left is the most common one found today. Both kits had morphine syrettes in them. Notice the small strand of wire with a round lead seal attached, on the lower left of the kit. This is the security seal. One end of the wire was attached to the zipper and if opened the broken wire revealed tampering.
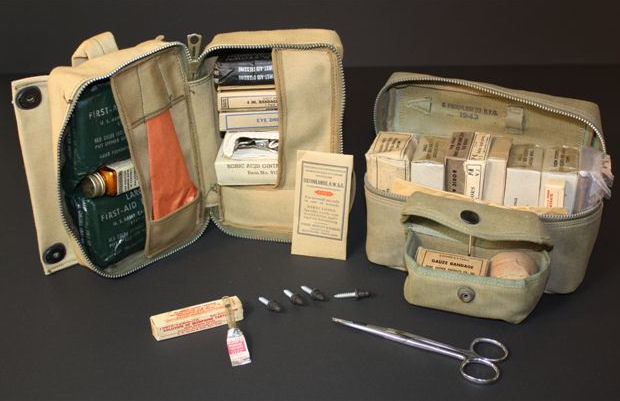
(6-14) Above are both kits opened, showing their original contents. I've removed the scissors from the kit on the right to show the manufactures name and 1943 date stamped on the underside of the top flap. The scissors in the kit on the left are still wrapped in their original reddish paper. Many of the kits found today still have a small envelope inside with four screw fasteners to mount the kit inside the aircraft. They are shown between the morphine and scissors.
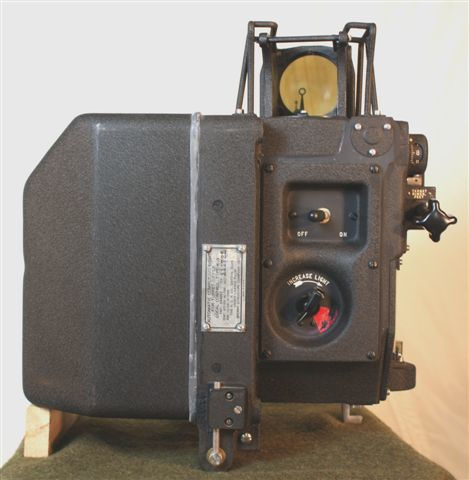
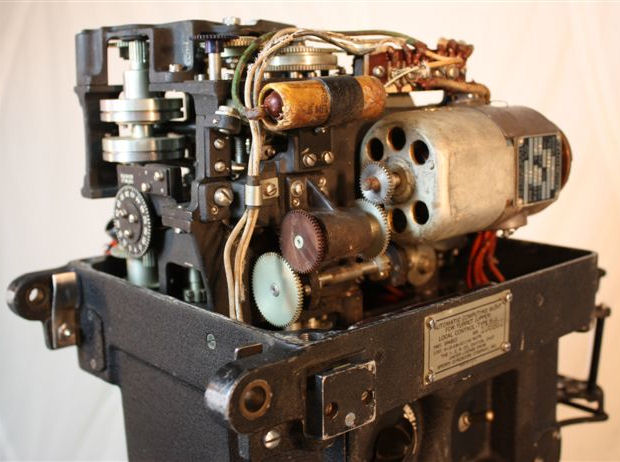
(6-15) Shown above is the K-3 automatic computing sight for both the Sperry upper and lower ball turret of the B-17. The side you see above is the side facing the gunner. Once he climbs into position, this sight is just inches from his face. In two of the photos below I have removed the cover from the left hand side to reveal how intricate and complex this sight is.
(6-16) You can see this sight in use in the 1990 Hollywood movie "The Memphis Belle." It shows up well in the top turret scenes and in the ball turret scenes. This sight was turned upside down when placed in the ball turret.
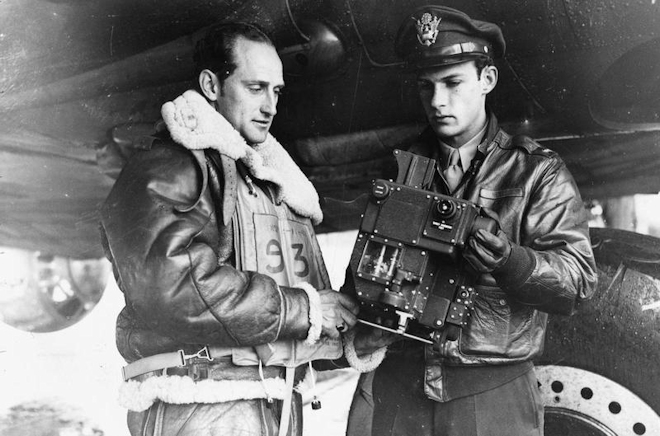
(6-XX) Two men of the 306th BG examine the K-3 gun sight.
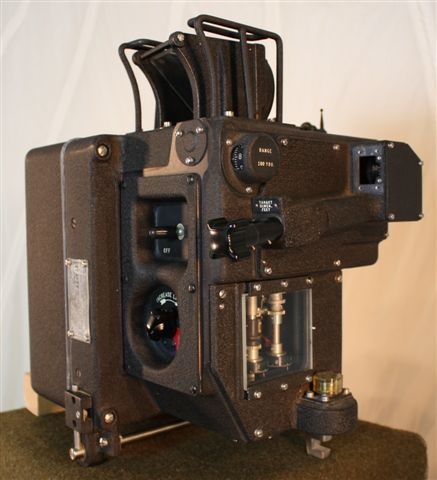
(6-17) With the cover removed, you can see how intricate and complex this sight is.
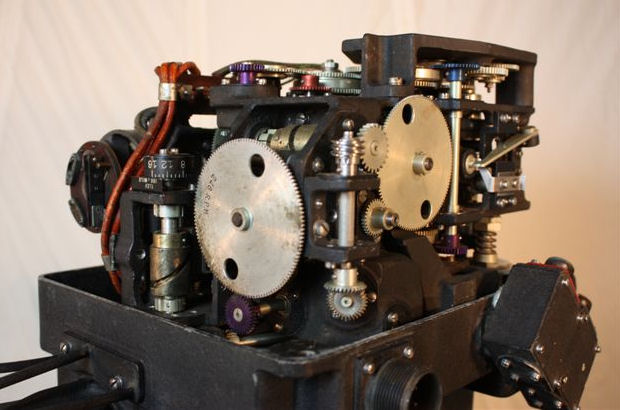
(6-18) With the cover removed, you can see how intricate and complex this sight is.
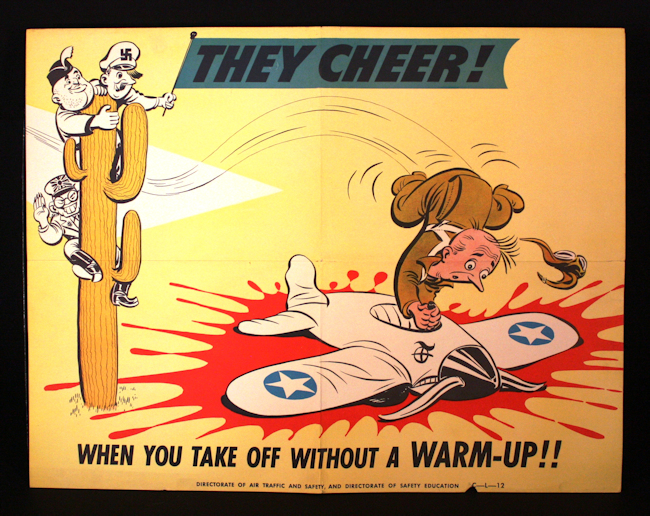
Above is an original WWII Safety Poster reminding pilots in training of the many mistakes new pilots make. All of the posters are 17 X 22 inches in size.
| The uniforms and gear presented here are from the private collection of Ed Nored. Any reproduction or other use of these copyrighted photographs is strictly forbidden. 303rdBG.com was granted exclusive rights to these photographs solely for historical purposes. The items shown are not for sale. |